
Job Walk Pro User Guide
Last updated: July 28, 2026
Job Walk Pro Overview
New to Job Walk Pro? Watch this overview to see the complete workflow from creating a project and documenting equipment in the field to generating a professional site-survey report.
1. Introduction
Job Walk Pro is a cloud-based site-survey and job-walk application designed to help construction and building professionals collect, organize, review, and report field information.
The application allows users to document projects, buildings, equipment, photographs, checklists, observations, and equipment details from a mobile device in the field and then review and complete the information through the web application.
Job Walk Pro is intended for professionals including:
- Mechanical contractors
- Engineers and consultants
- Estimators
- Facility and asset management teams
- Project managers
- Property management firms
- Maintenance personnel
- Building survey professionals
The primary objective of Job Walk Pro is to replace handwritten notes, disconnected photographs, spreadsheets, and manually assembled reports with one organized project workflow.
2. Quick Start Guide
This Quick Start Guide is designed to help you complete your first project with minimal effort. Most users can create their first project and generate a professional report in approximately 10–15 minutes. For more detailed instructions, refer to the corresponding chapters later in this User Guide.
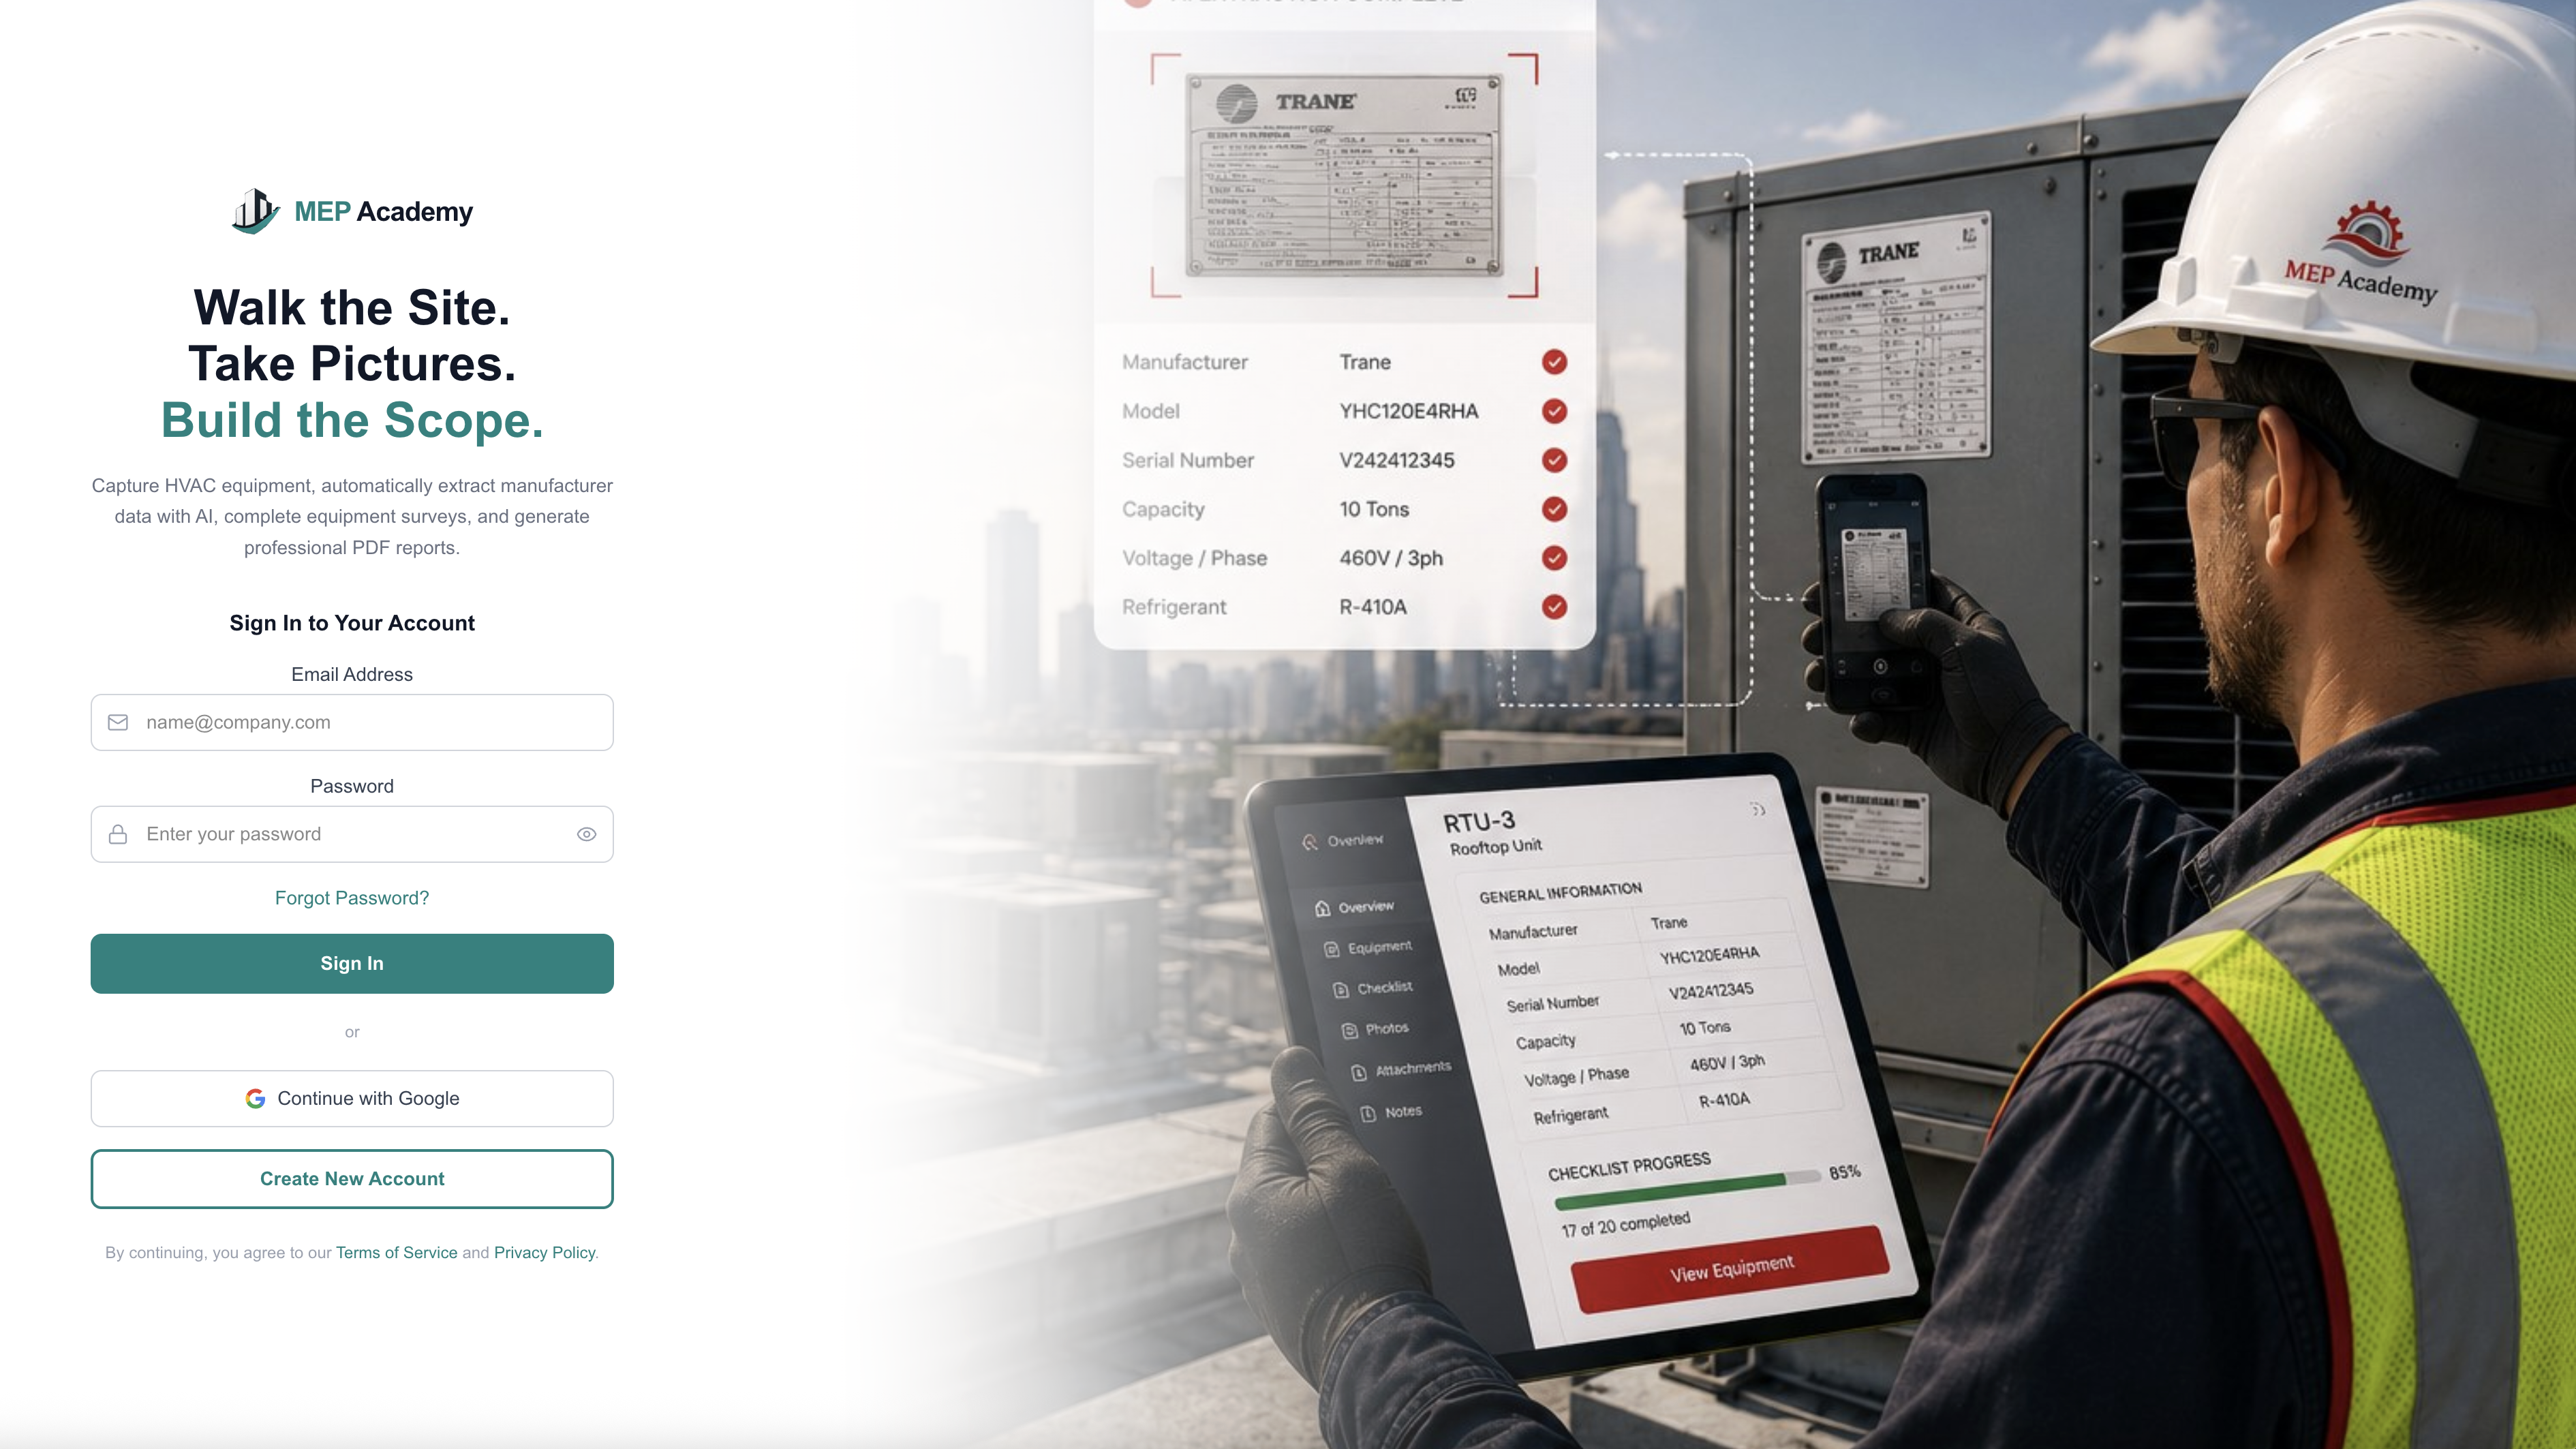
Step 1 — Sign In
- Open the Job Walk Pro web application or mobile app.
- Sign in using your email and password, or choose Continue with Google if your account uses Google Sign-In.
- After signing in, the Dashboard or Project List will appear.
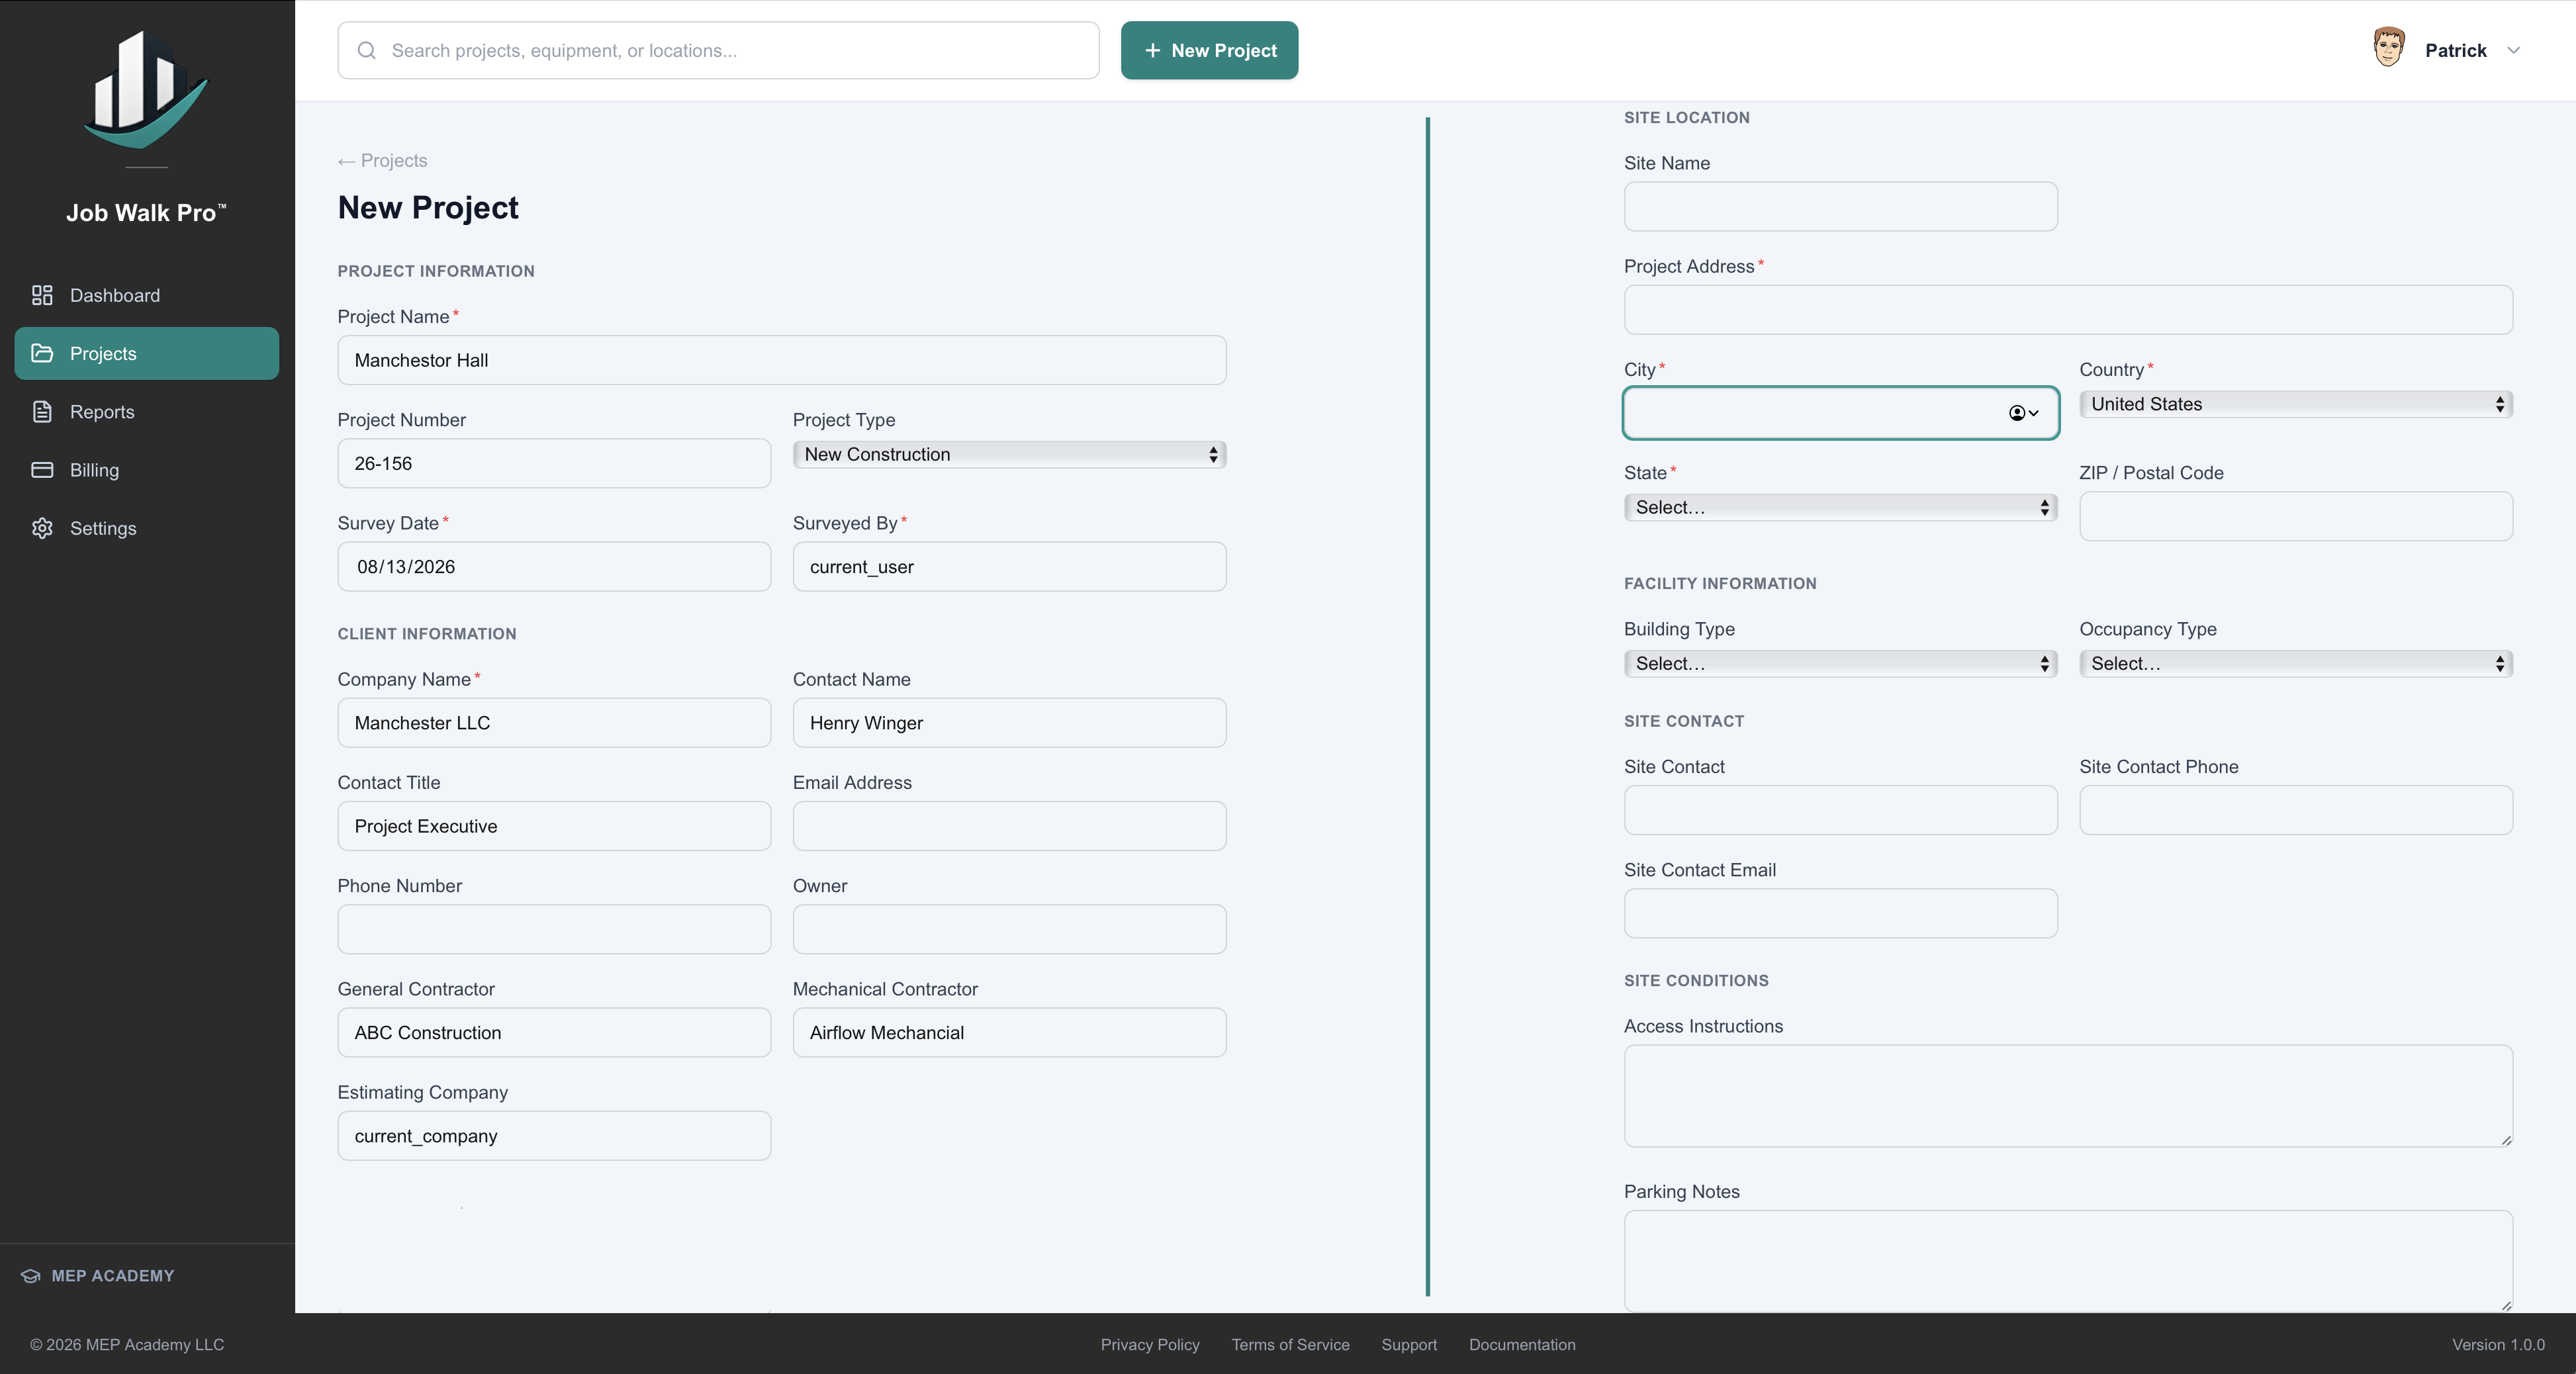
Step 2 — Create a New Project
- Select Create Project.
- Enter the project information, including Project Name, Building Name, Building Address, Customer Name (if applicable), and Project Number (optional).
- Select Save.
Tip: Use descriptive project names such as Westside Medical Center RTU Survey instead of Project 1 or Test.
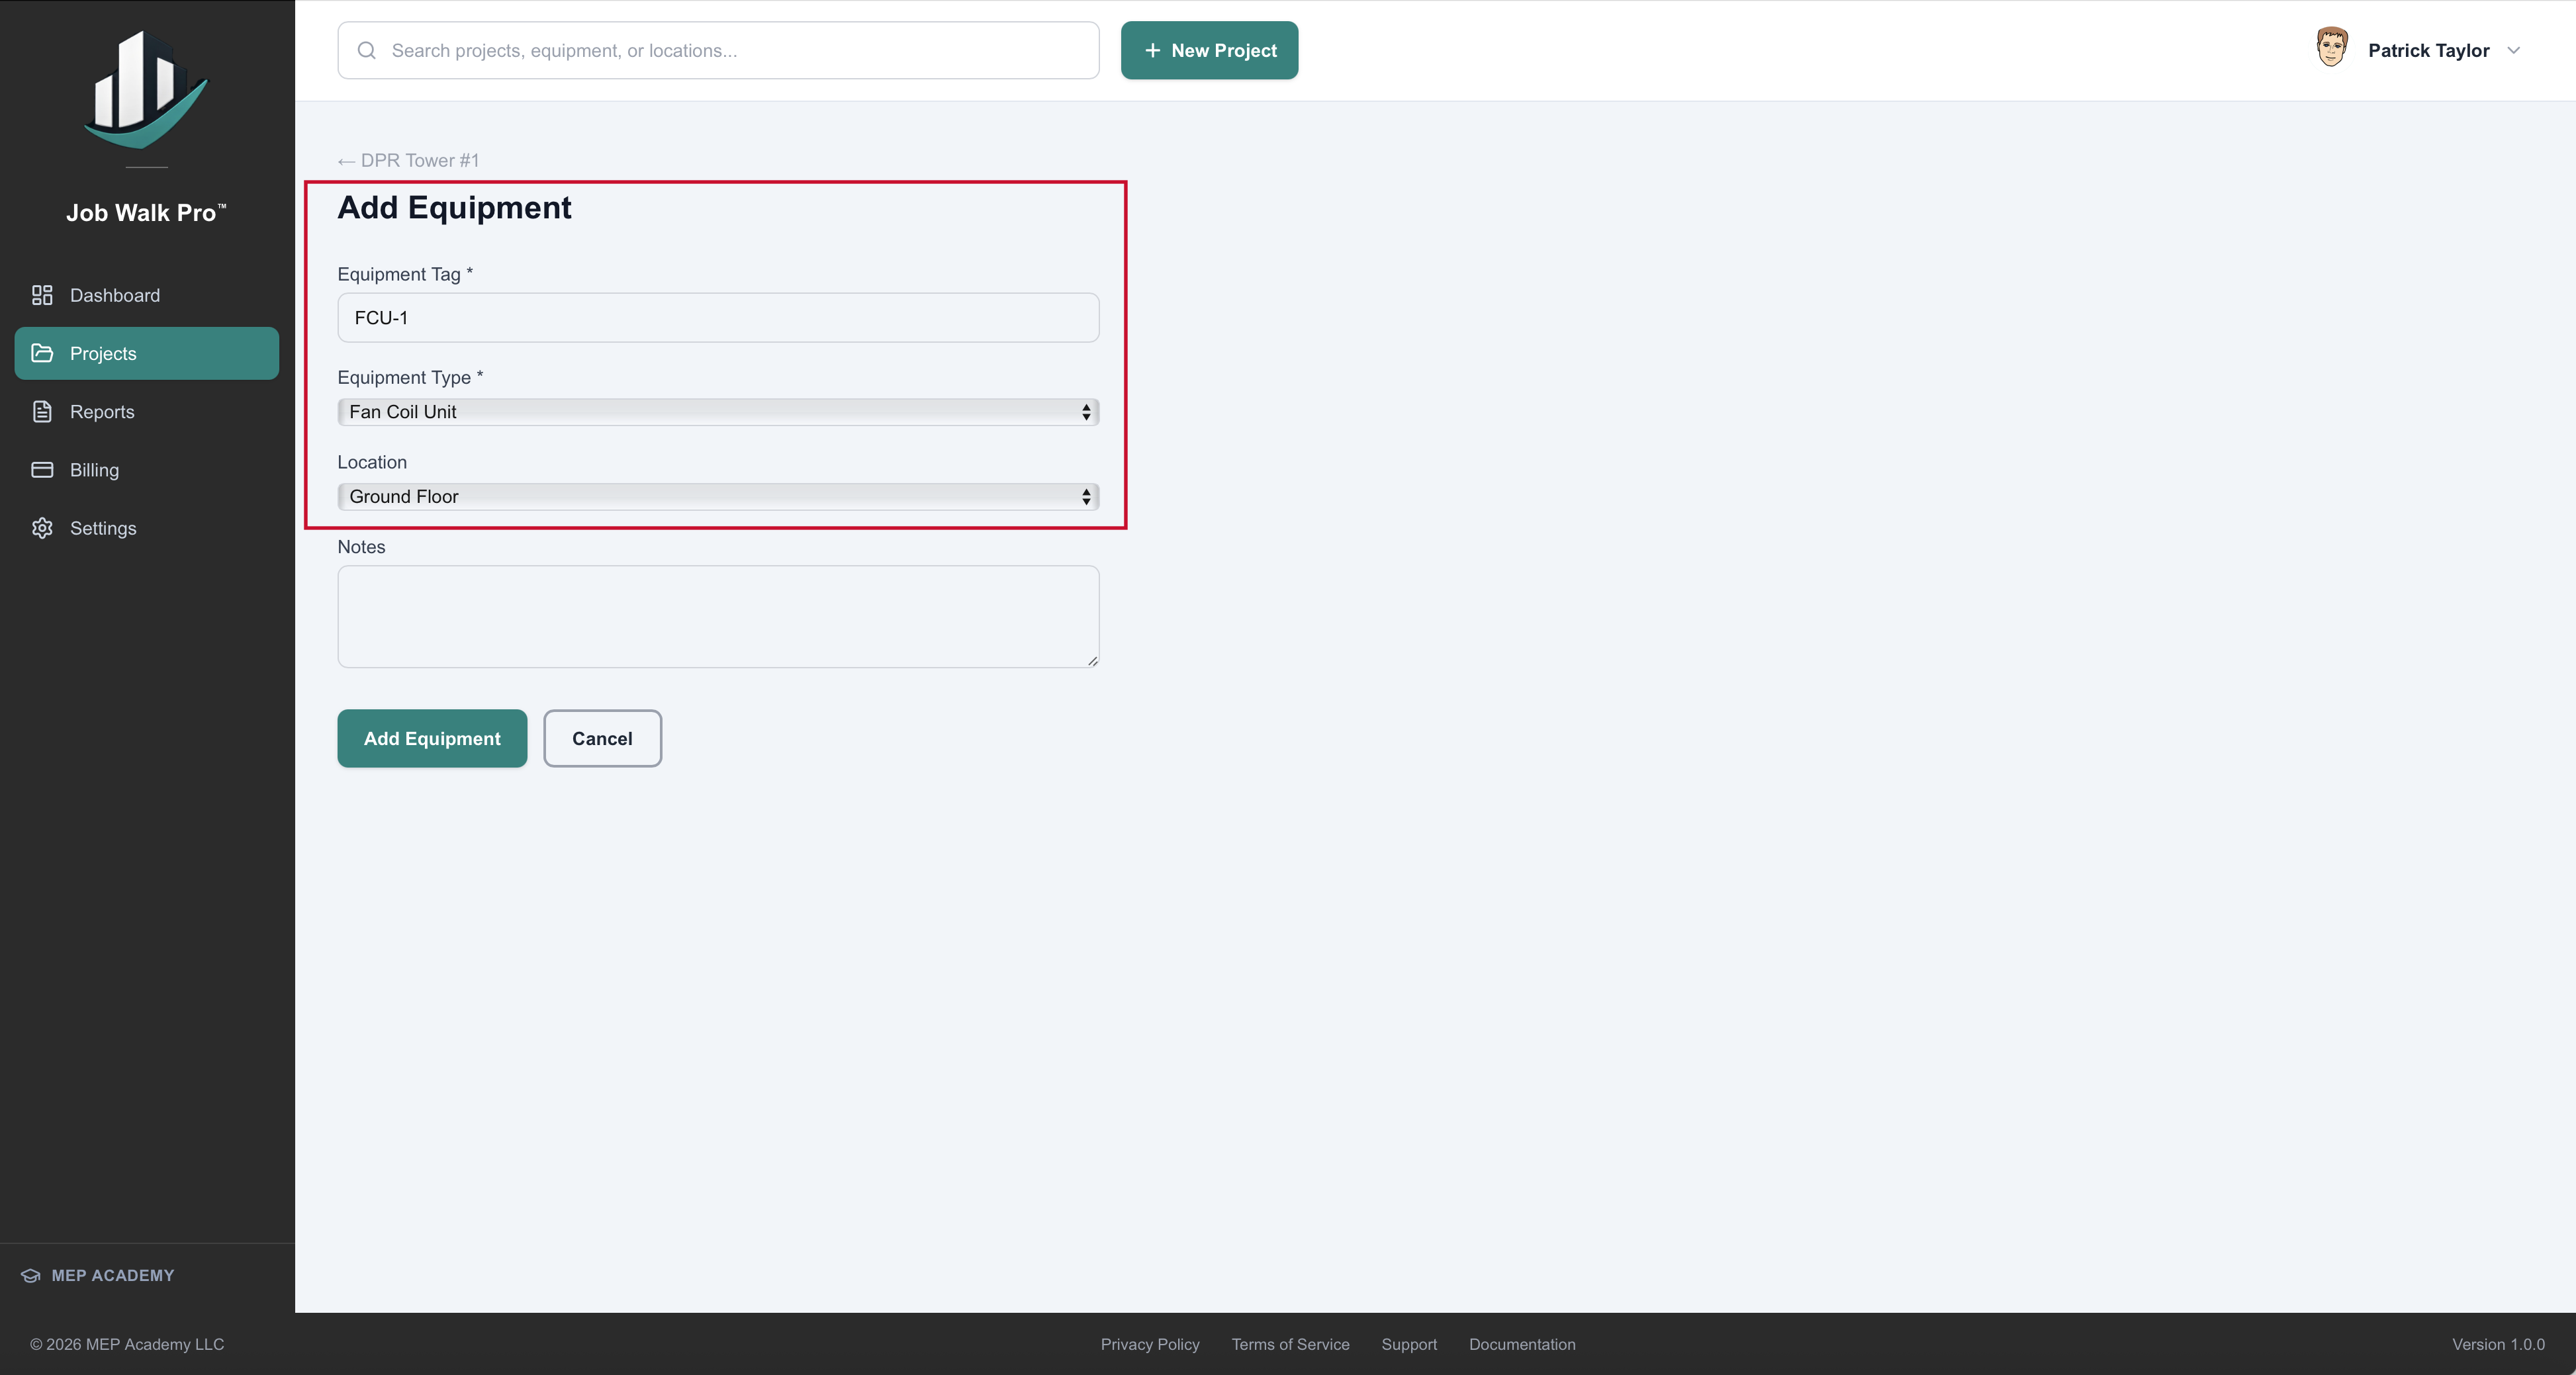
Step 3 — Add Equipment
- Open the newly created project.
- Select Add Equipment.
- Enter Equipment Type, Equipment Name (such as RTU-1 or AHU-2), and Equipment Location.
- Save the equipment record.
Repeat this process for each piece of equipment included in the survey.
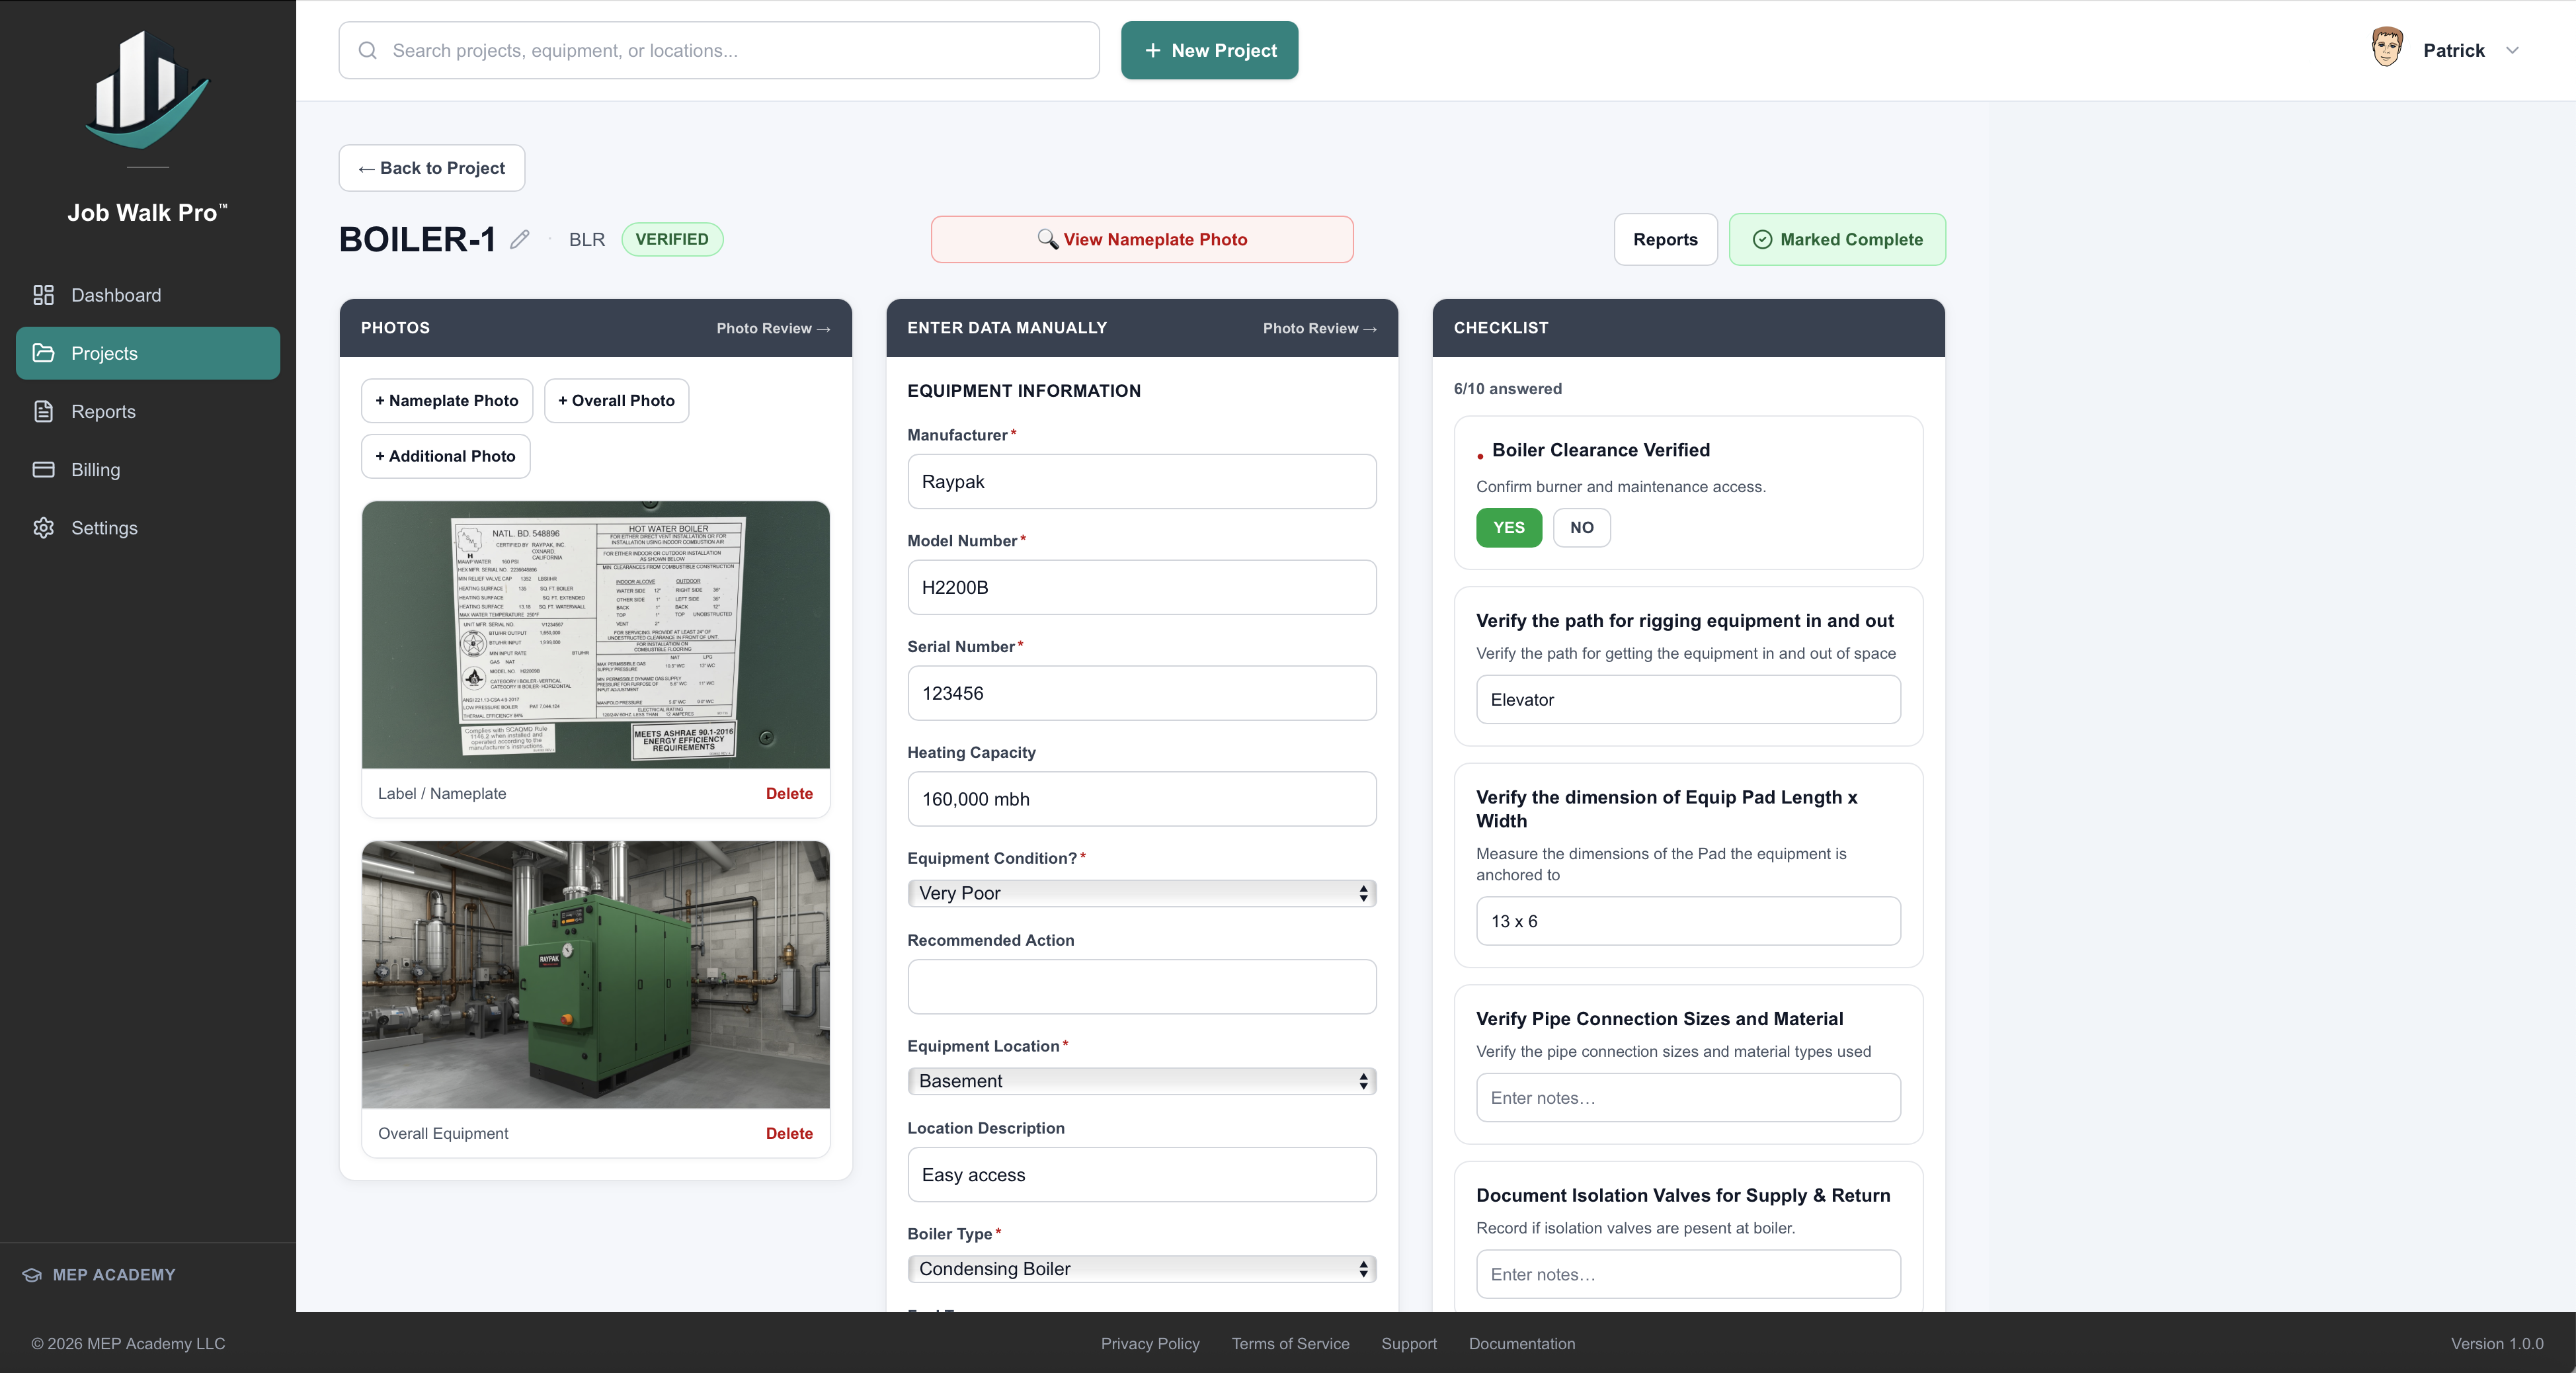
Step 4 — Complete the Equipment Record
Open each equipment record and enter the available information, including Manufacturer, Model Number, Serial Number, Capacity, Electrical Information, Mechanical Information, and other available fields. If a value cannot be verified, leave the field blank rather than guessing.
Step 5 — Capture Photographs
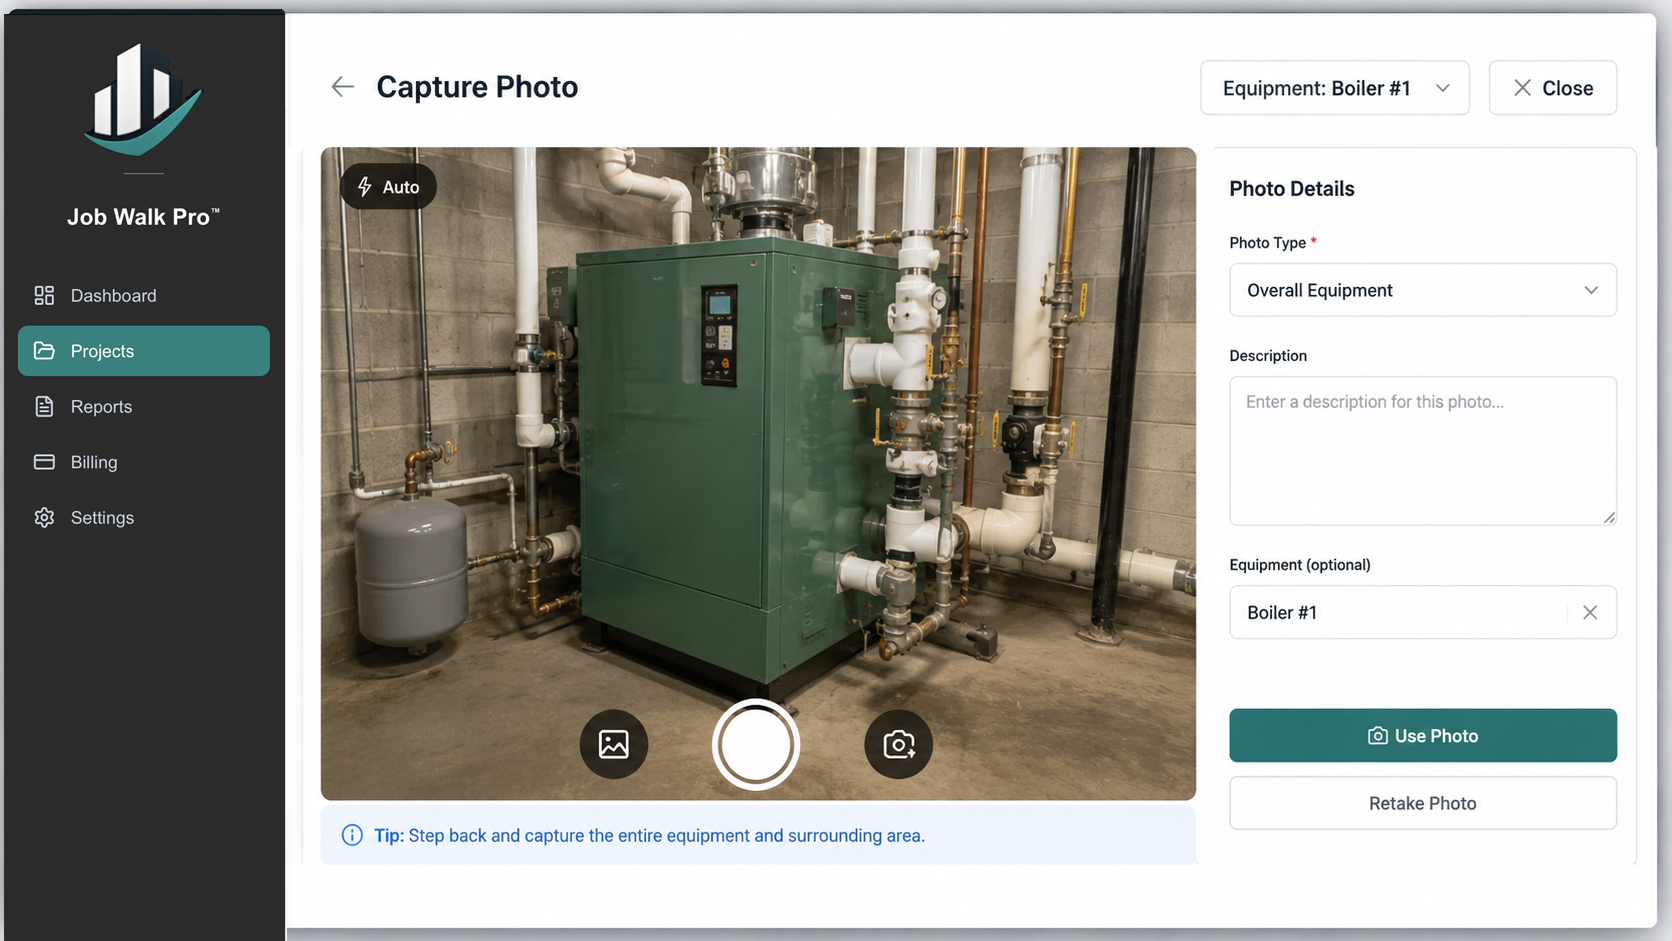
Photographs are one of the most valuable parts of your documentation. For each piece of equipment, capture an overall view, a second angle if helpful, the manufacturer’s nameplate, and any visible deficiencies or damaged components. Review each photograph before leaving the equipment to ensure it is clear and readable.
Step 6 — Complete the Checklist
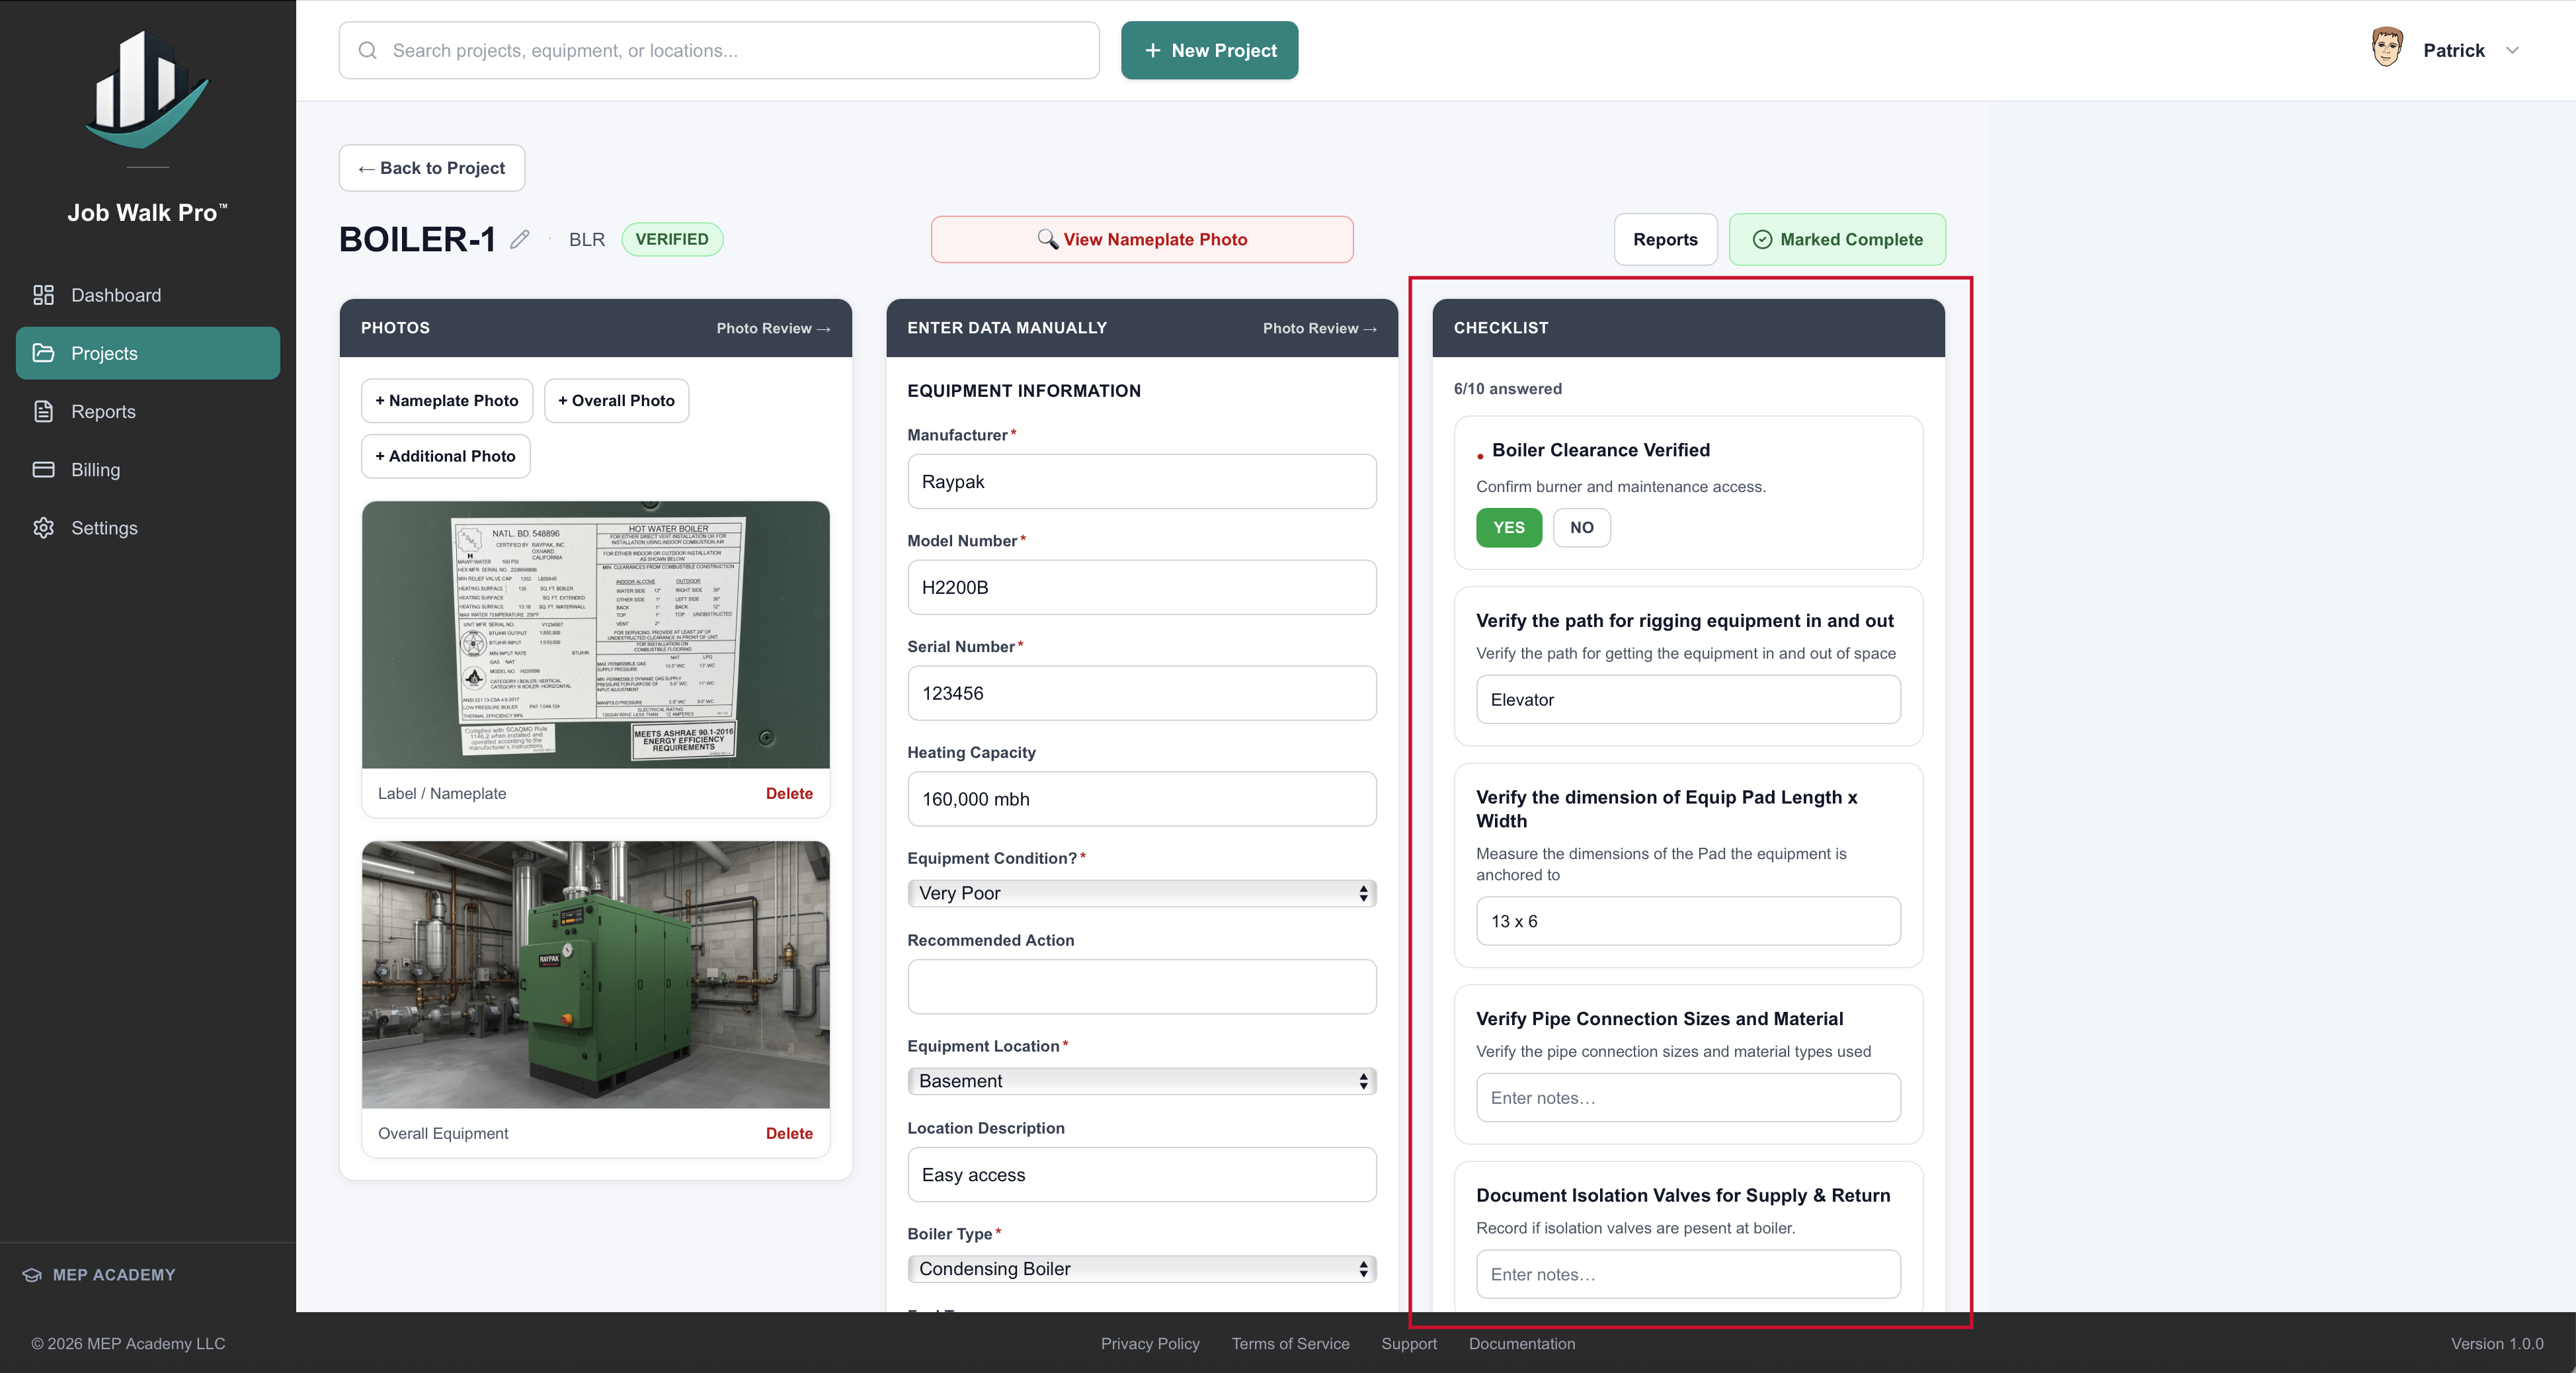
Open the Checklist tab and answer each inspection item based on your observations. If something cannot be verified safely, record a note rather than guessing. Add any additional observations that may help explain the equipment’s condition.
Step 7 — Repeat for Remaining Equipment
Continue adding and documenting each piece of equipment until the entire survey has been completed. For best results, complete each equipment record before moving to the next piece of equipment. A recommended workflow is: Add Equipment → Enter Details → Capture Photos → Complete Checklist → Review Record → Move to Next Equipment.
Step 8 — Review Your Project
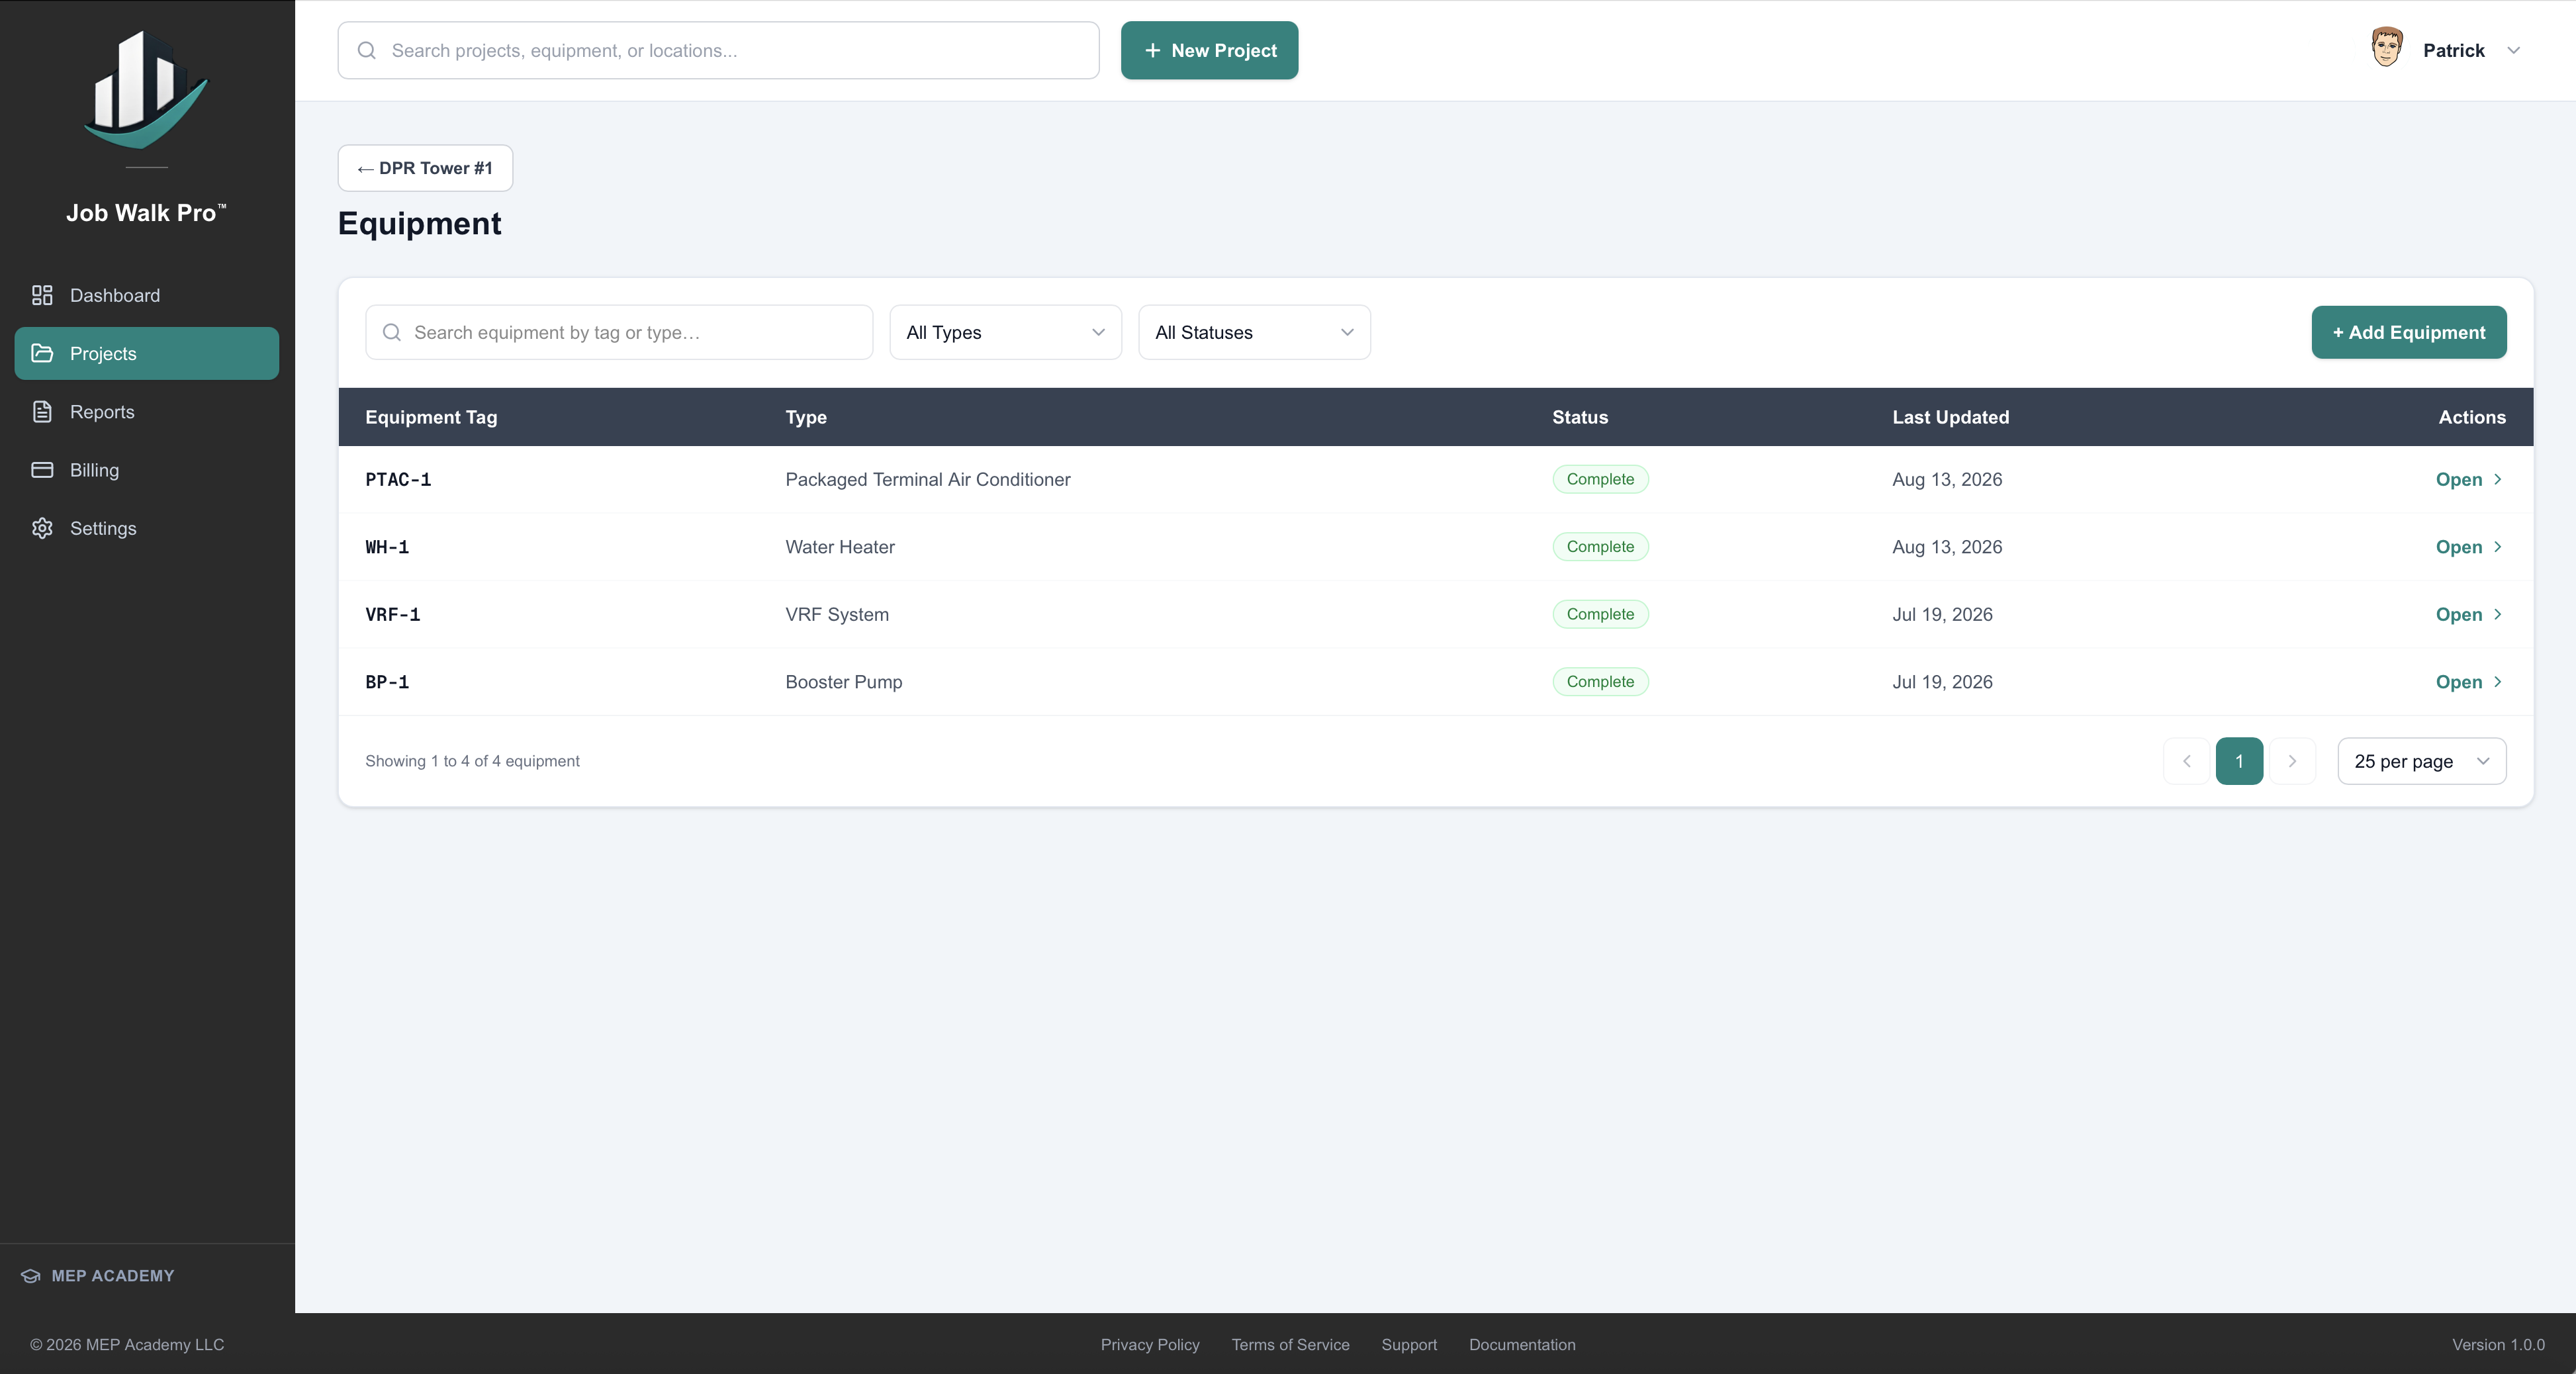
Before leaving the site: verify every intended piece of equipment has been documented, review photographs for clarity, check that required fields have been completed, and correct any errors while still on-site. A final review helps avoid return trips.
Step 9 — Synchronize Your Project
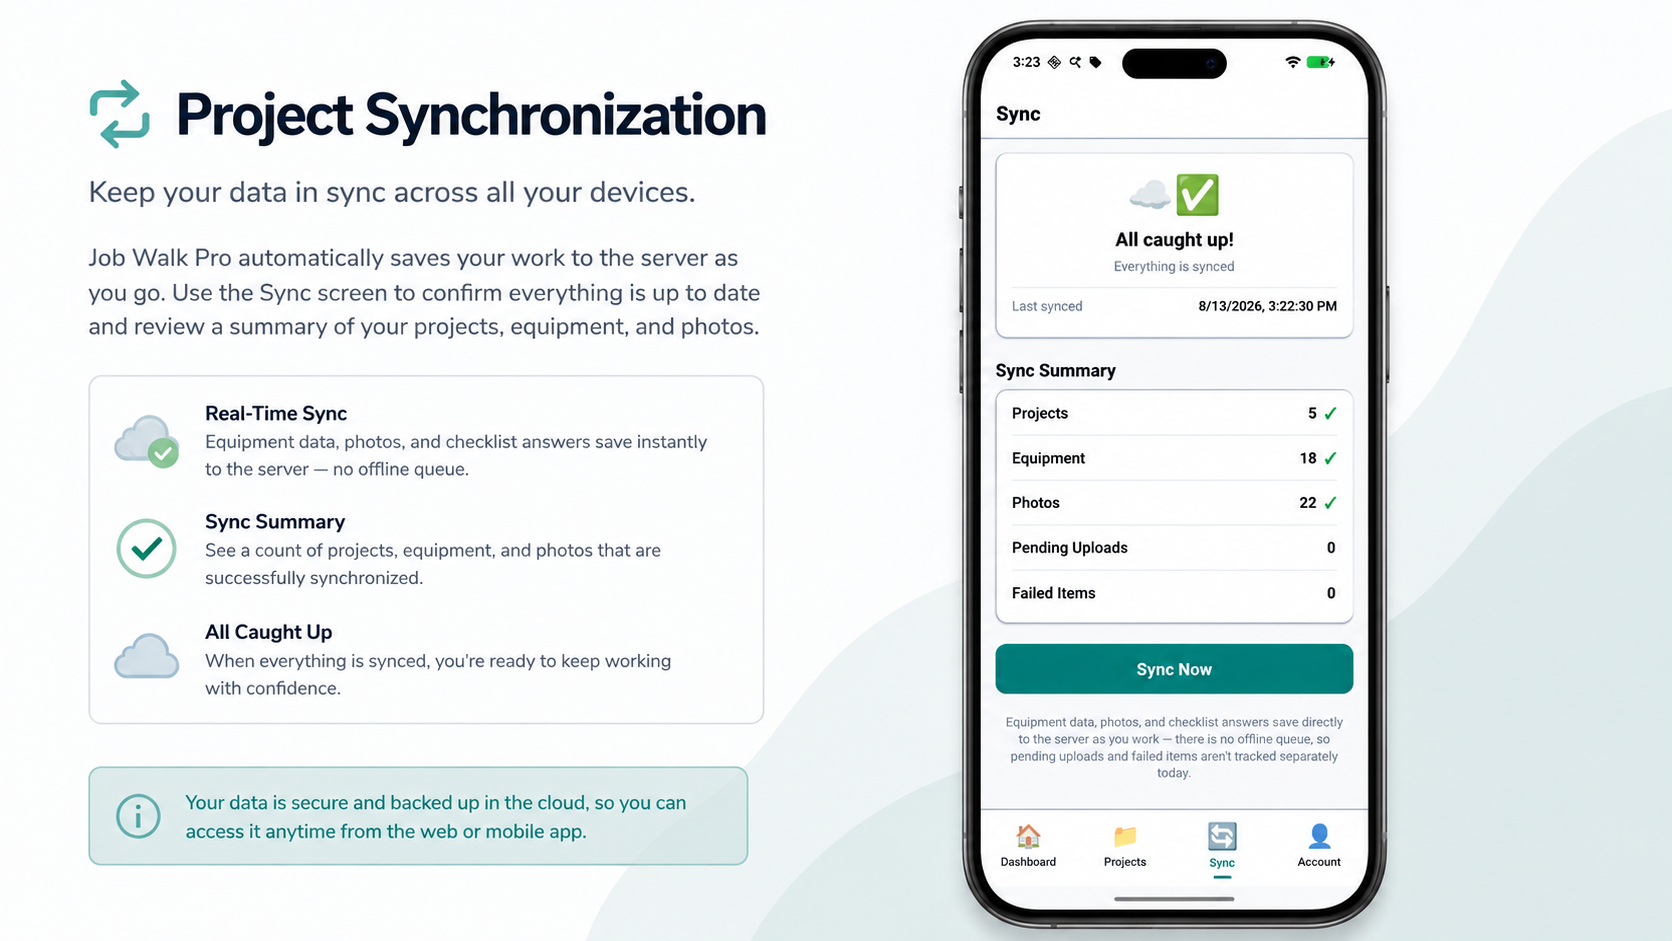
Ensure the mobile device has an Internet connection and allow Job Walk Pro to synchronize your project with the cloud. Once back at the office, open the web application, open the project, and confirm that all equipment, photographs, notes, and checklist items appear correctly.
Step 10 — Generate Your Report
- Open the Reports section.
- Select the report sections you wish to include.
- Choose Generate Report.
- Review the completed report.
- Download or share the report as needed.
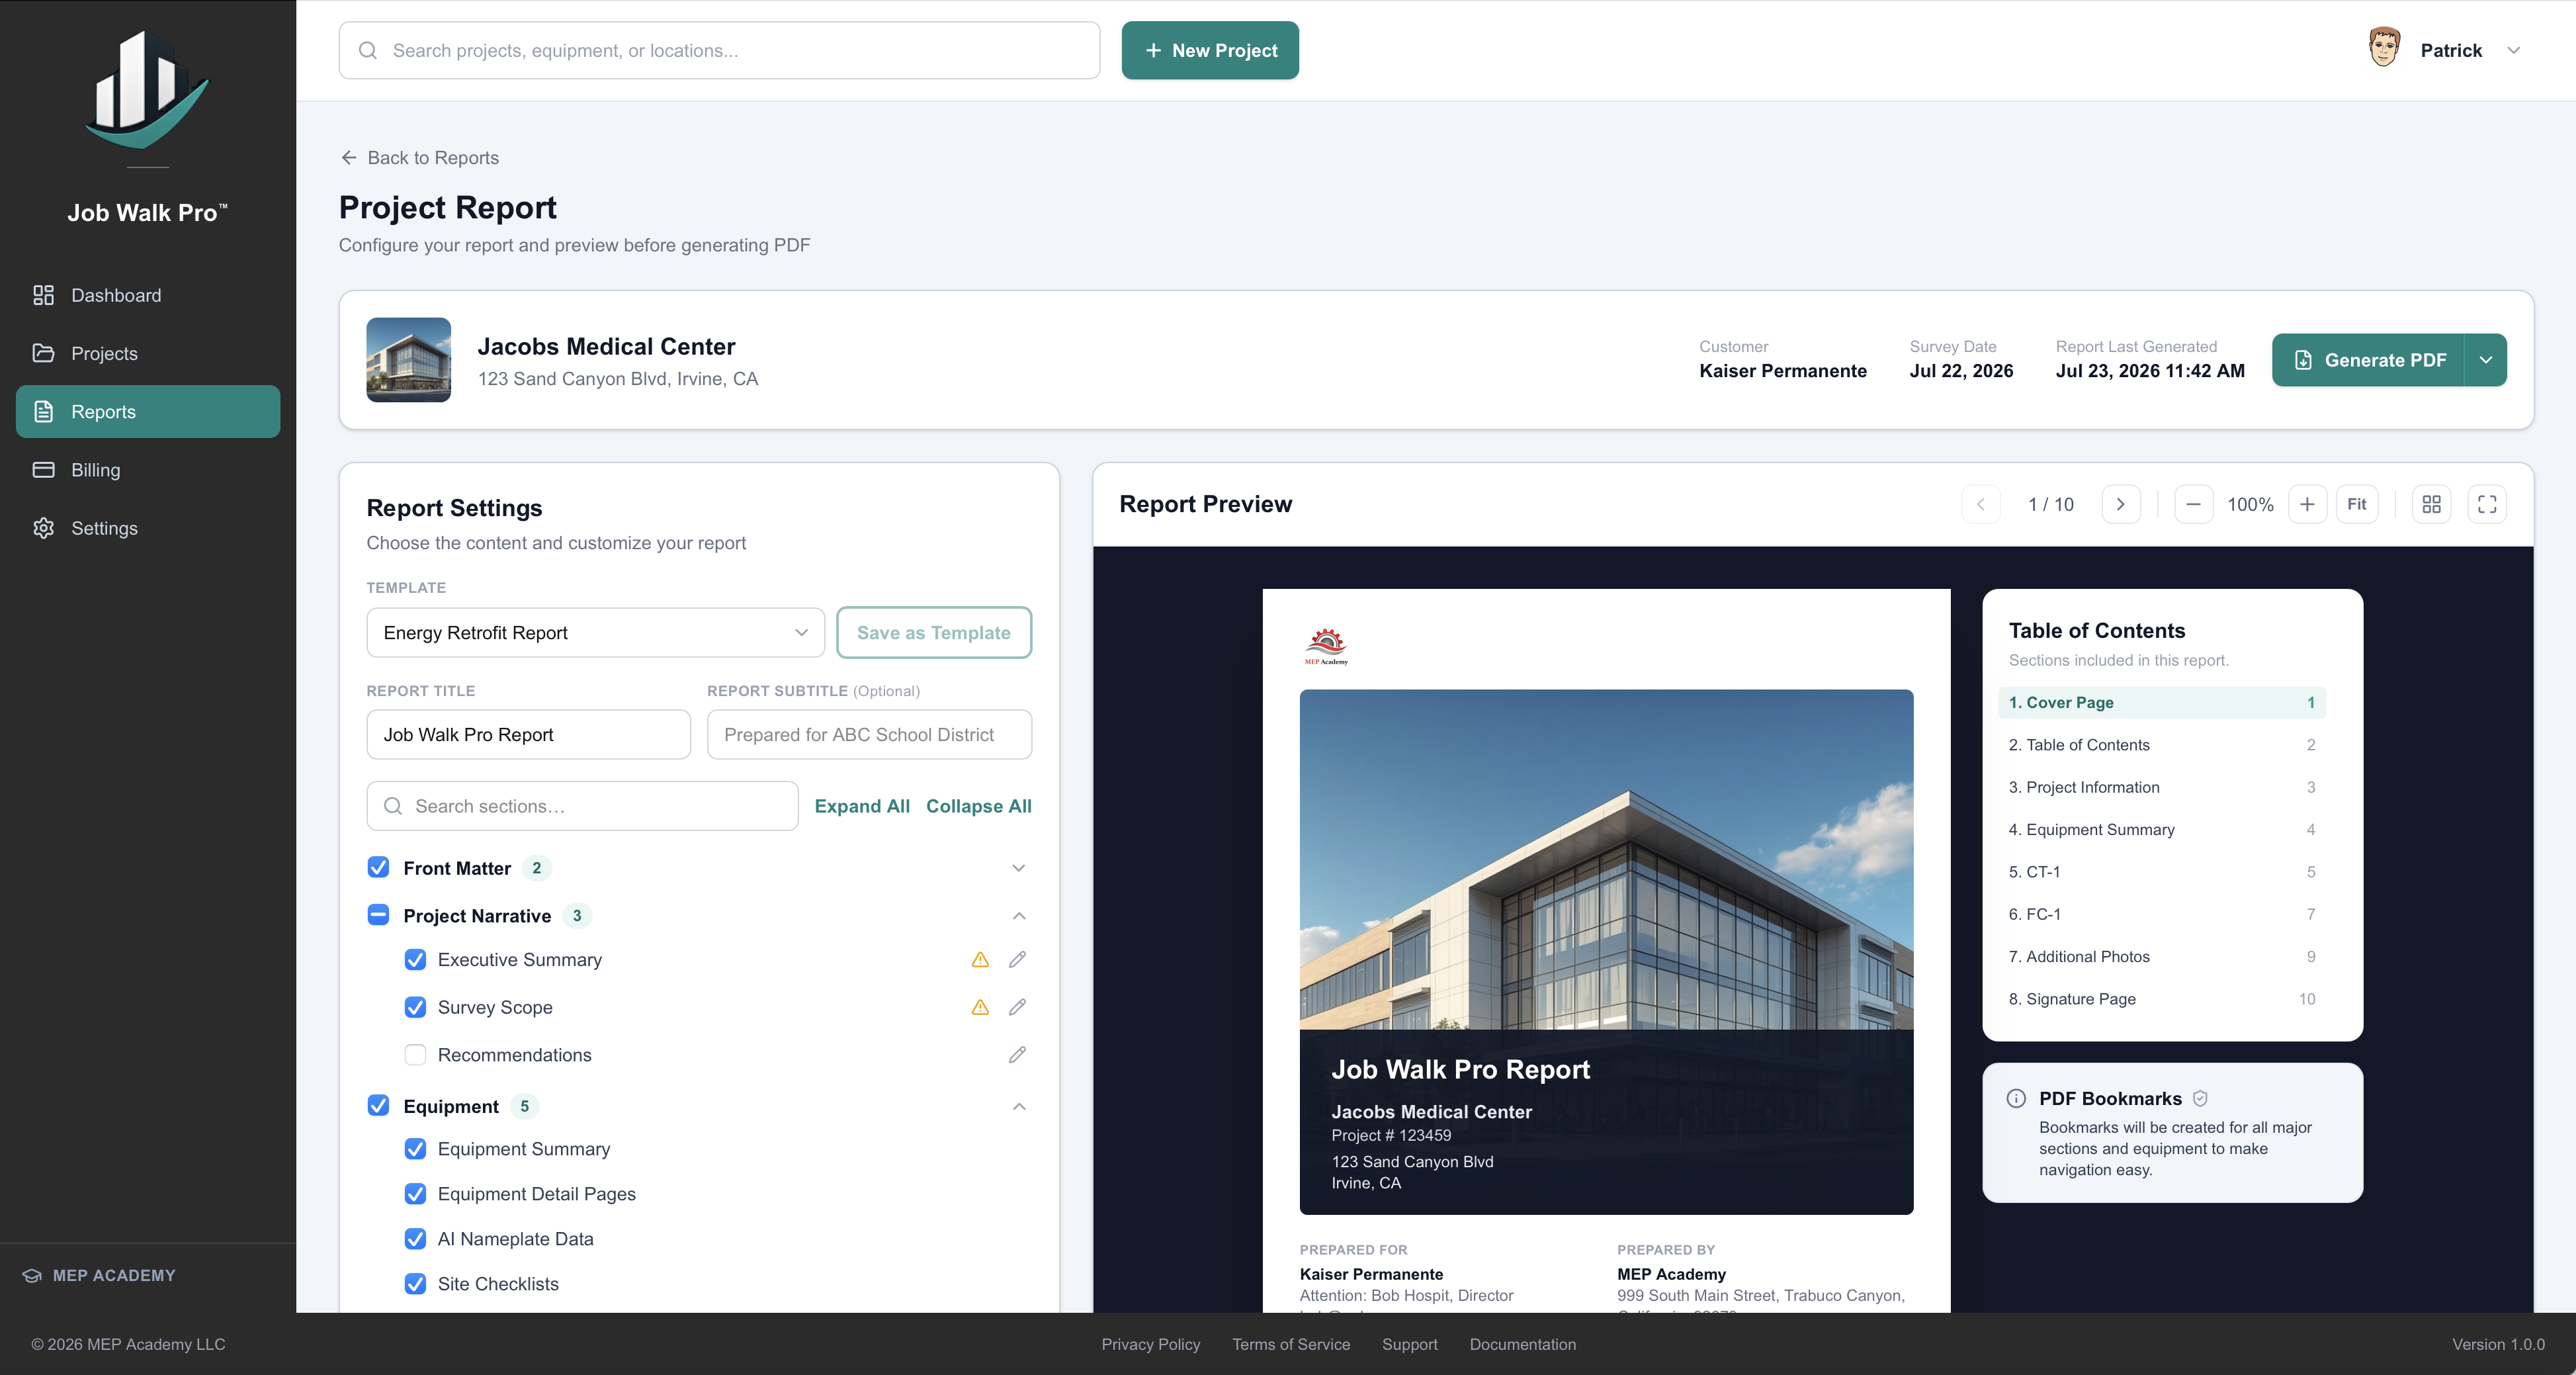
Quick Start Checklist
Use this checklist to confirm your project is complete before delivering your report.
- Created a new project
- Verified project information
- Added all equipment
- Entered manufacturer, model, and serial numbers
- Captured equipment overview photographs
- Captured readable nameplate photographs
- Completed equipment checklists
- Added notes where appropriate
- Reviewed all equipment records
- Confirmed project synchronization
- Generated and reviewed the final report
3. How Job Walk Pro Works
A typical Job Walk Pro workflow consists of the following steps:
- Create or select a project.
- Enter the project and building information.
- Add each piece of equipment being surveyed.
- Record equipment information.
- Capture and label photographs.
- Complete the applicable checklist.
- Review the project for missing information.
- Synchronize the field information with the web application.
- Generate and download the completed project report.
The mobile application is primarily used to collect information in the field. The web application is primarily used to:
- Review project information
- Correct or complete records
- Organize equipment
- Review photographs
- Configure report content
- Generate professional reports
- Manage the account and subscription
Both applications use the same Job Walk Pro account and project database.
4. Before Starting a Job Walk
Before arriving at the project site, complete the following preparation.
4.1 Confirm Account Access
Verify that you can sign in to Job Walk Pro using the account you intend to use in the field. Confirm that your email address and password work, your subscription is active, the mobile application is installed and current, and the correct account is being used on both the web and mobile applications. Avoid creating separate accounts for the same project unless your organization has intentionally assigned different accounts.
4.2 Confirm Internet Access
Job Walk Pro uses cloud synchronization to transfer project information between the mobile and web applications. Before beginning the survey, confirm that the mobile device has a cellular or Wi-Fi connection, open the application and allow existing projects to synchronize, and confirm that the project appears on the mobile device before entering the site.
Internet availability may be limited in mechanical rooms, basements, rooftops, and large facilities. Information should be allowed to synchronize whenever a reliable connection becomes available.
4.3 Prepare the Mobile Device
Before beginning fieldwork: fully charge the mobile device, confirm that sufficient device storage is available, clean the camera lens, confirm that Job Walk Pro has permission to use the camera, confirm that automatic screen rotation and brightness settings are appropriate, and carry a portable battery charger for long surveys where practical.
A clear camera lens and adequate lighting significantly improve equipment and nameplate photographs.
4.4 Gather Available Project Information
Before creating the project, gather any information already available, such as:
- Project name
- Project number
- Building name
- Building address
- Customer or client name
- Site contact
- Survey date
- Survey purpose
- Building type
- Known equipment list
- Scope of work
- Existing drawings or equipment schedules
Entering this information before the site visit reduces field time and improves consistency.
4.5 Understand the Survey Scope
Before collecting information, confirm what the job walk is intended to accomplish. The survey may be intended to document:
- Existing equipment
- Equipment replacement requirements
- Maintenance conditions
- Project estimating information
- Facility asset records
- Mechanical-system conditions
- Equipment nameplate information
- Installation deficiencies
- General site conditions
- Photographic records
The survey scope determines which equipment, photographs, checklist items, and observations should be recorded.
5. Signing In
5.1 Sign In with Email and Password
- Open the Job Walk Pro web or mobile application.
- Enter the email address associated with your account.
- Enter your password.
- Select Sign In.
- Wait for the Dashboard or Project List to appear.
If the password is not accepted, confirm that the correct email address is being used and that Caps Lock is not enabled.
5.2 Sign In with Google
Where Google Sign-In is available: open the Job Walk Pro sign-in page, select Continue with Google, select the Google account associated with Job Walk Pro, complete any Google verification steps, and wait for Job Walk Pro to open.
Use the same Google account each time. Selecting a different Google account may create or access a different Job Walk Pro account.
5.3 Reset a Forgotten Password
- Select Forgot Password from the sign-in page.
- Enter the email address associated with the account.
- Select the password-reset option.
- Open the email sent by Job Walk Pro.
- Select the reset link.
- Enter and confirm the new password.
- Return to Job Walk Pro and sign in.
Password-reset links expire after a limited period. Request a new link if the original link has expired. Do not share password-reset emails or links with another person.
6. Dashboard Overview
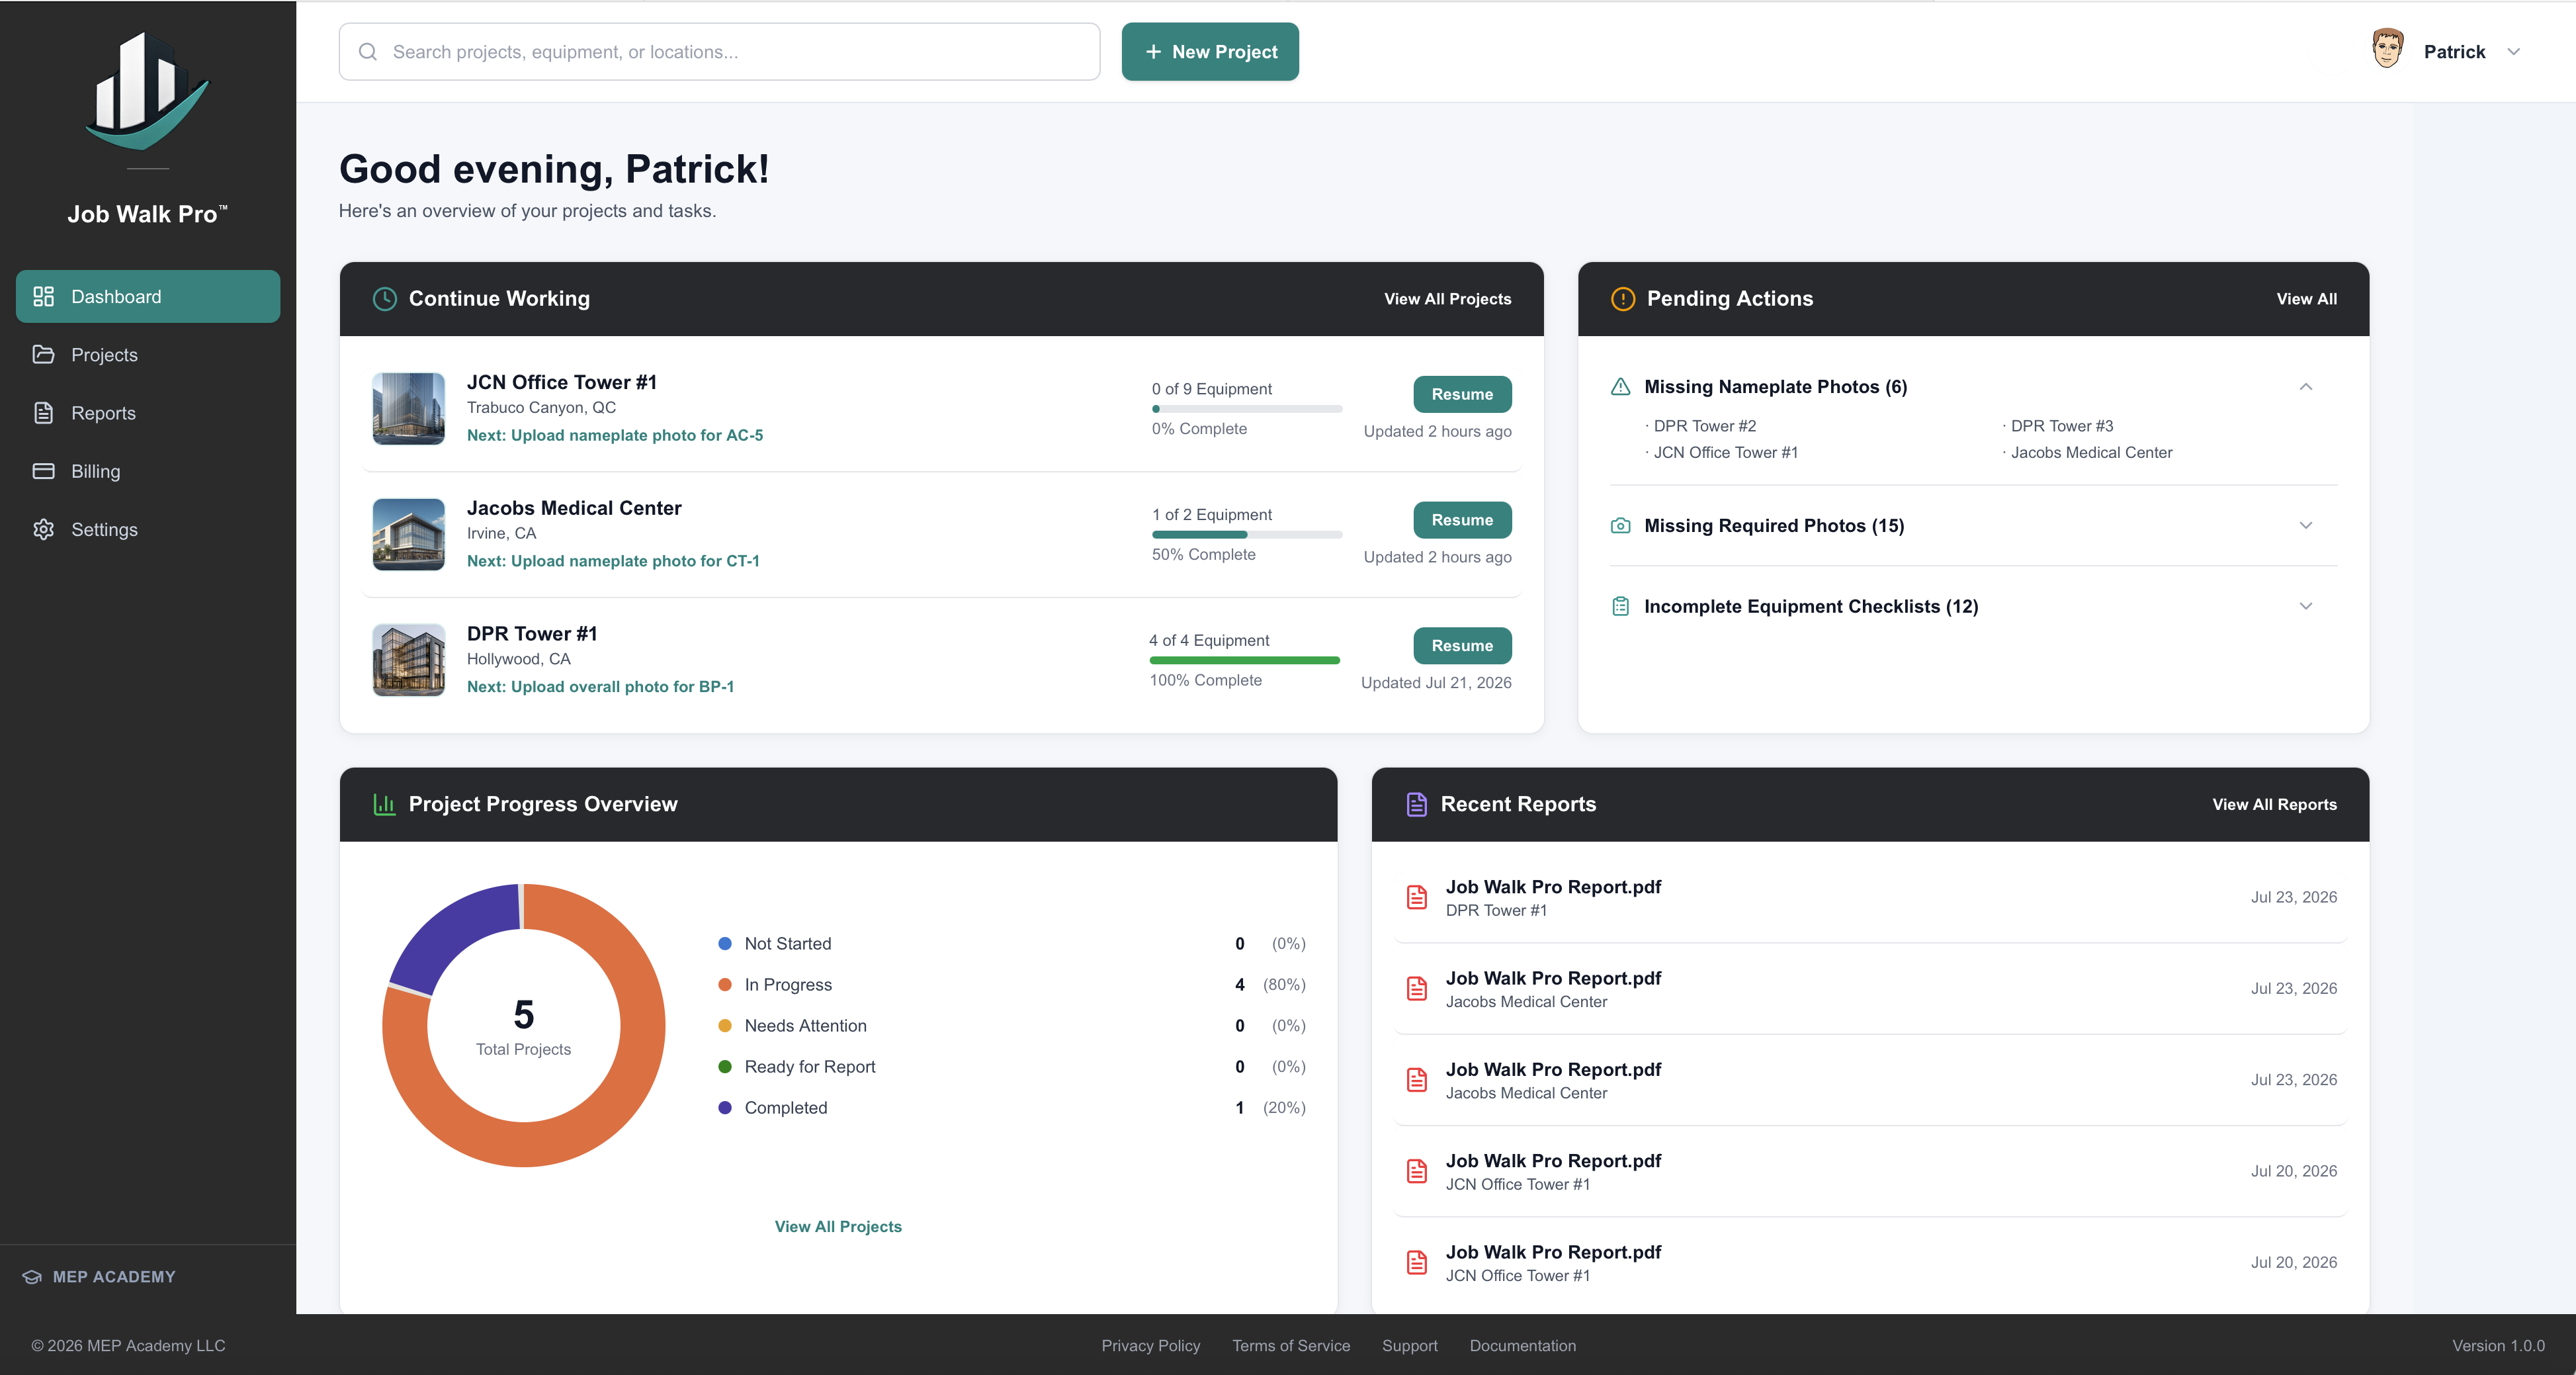
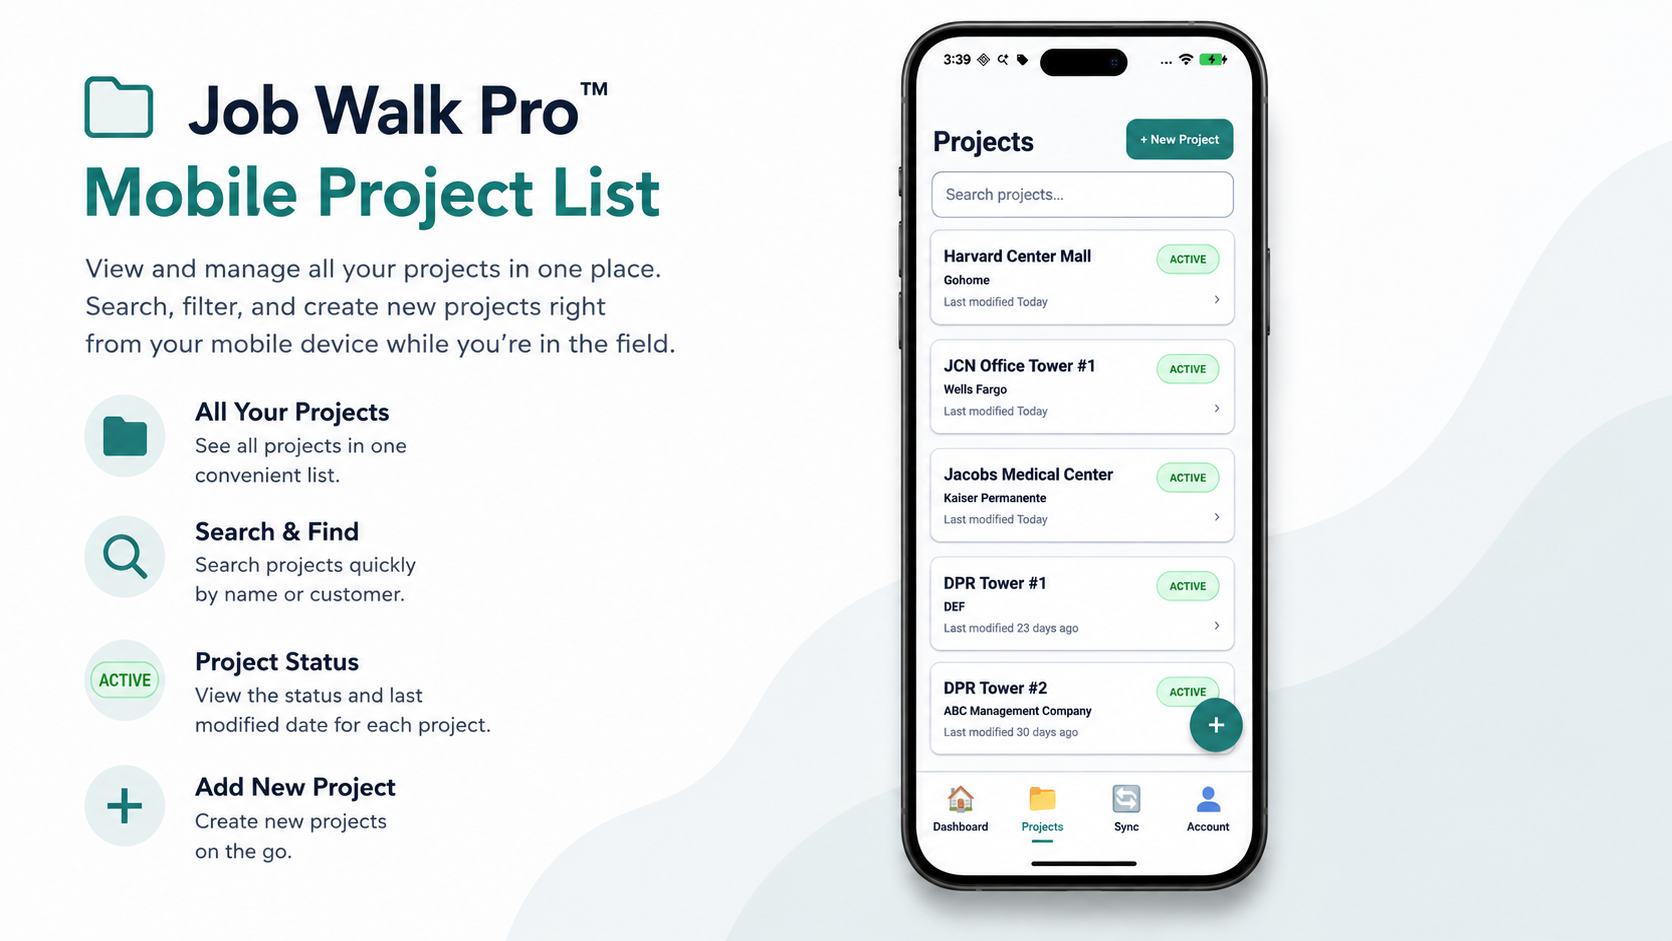
After signing in to the web application, the Dashboard provides access to the primary Job Walk Pro functions. The Dashboard may display existing projects, recently updated projects, project status, equipment counts, report actions, account settings, subscription information, and a button to create a new project.
The mobile application may open directly to the Project List or a mobile Dashboard containing similar project information.
From the Dashboard, users can create a project, open an existing project, review project progress, or continue an unfinished job walk.
7. Creating a New Project
Create one project for each distinct job walk, site survey, building assessment, or customer assignment.
7.1 Start a New Project
- Sign in to Job Walk Pro.
- Open the Dashboard or Project List.
- Select Create Project or New Project.
- Enter the requested project information.
- Review the information for accuracy.
- Select Save or Create Project.
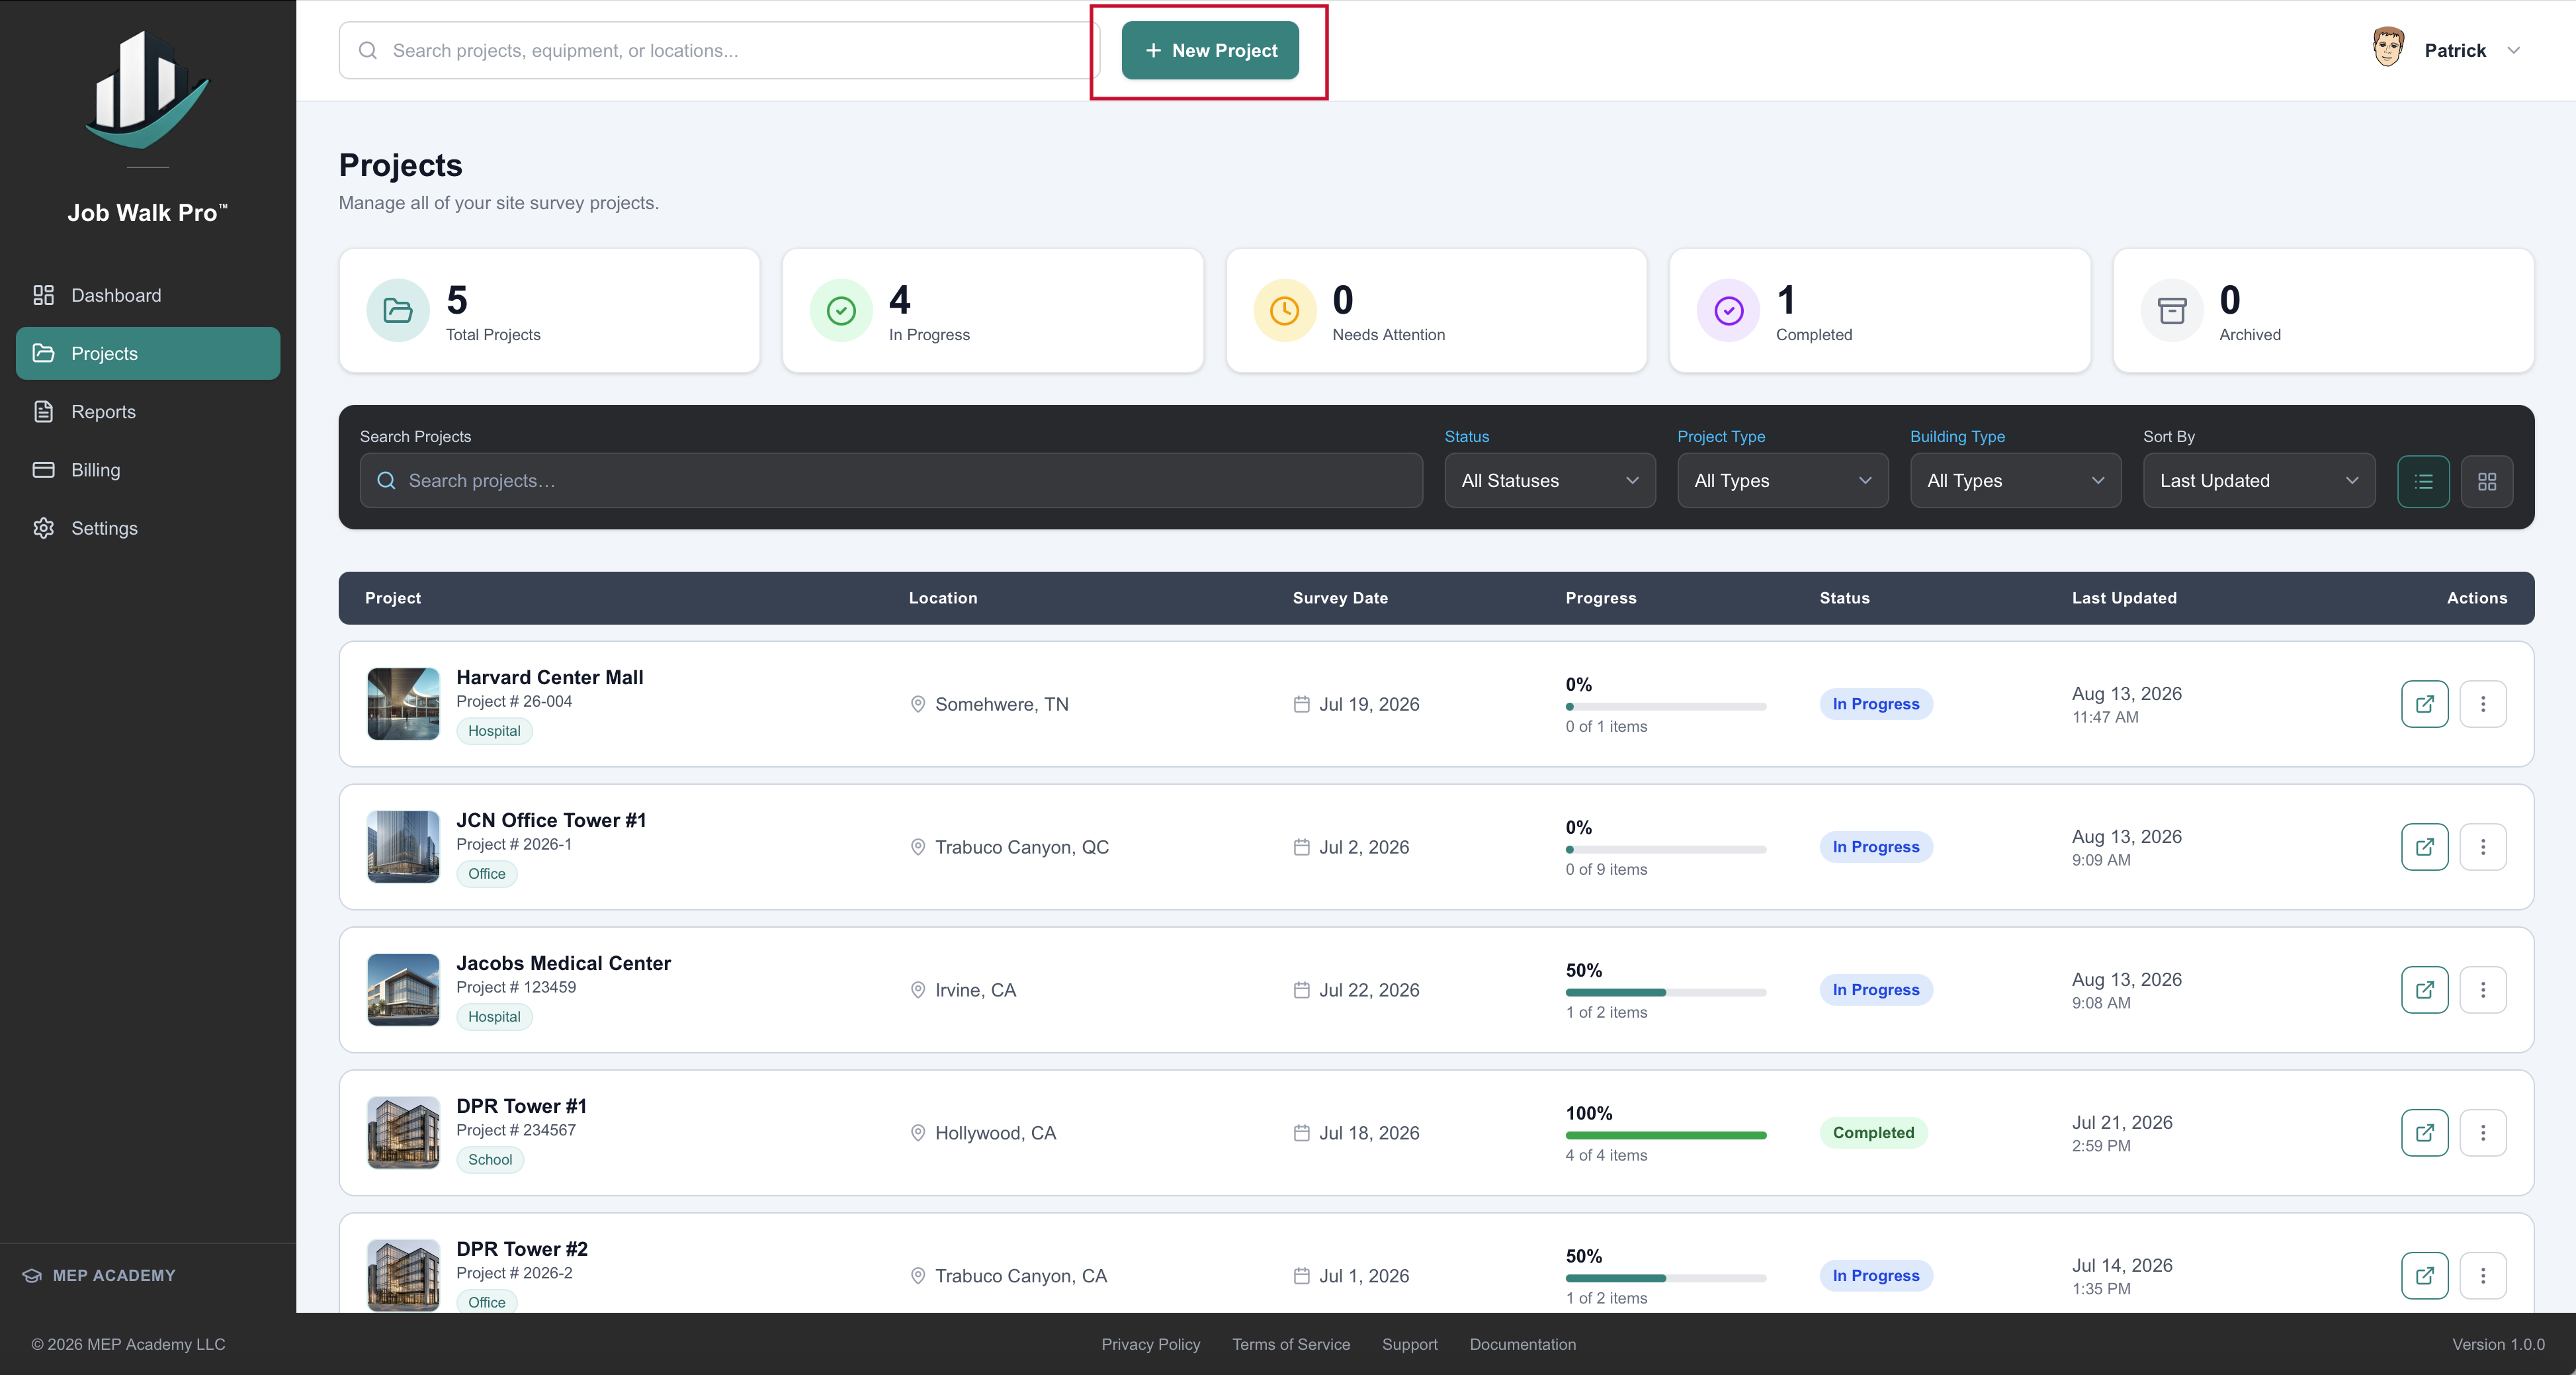
7.2 Enter the Project Name
Use a project name that clearly identifies the assignment. Good examples include:
- Central Office HVAC Equipment Survey
- Lincoln High School Boiler Replacement
- Westside Medical Center Rooftop Unit Survey
- Building 4 Mechanical Equipment Inventory
- Apartment Complex Due Diligence Survey
Avoid vague names such as New Project, Test, Building, or Survey. A consistent naming format makes projects easier to locate later.
7.3 Enter the Project Number
Where applicable, enter the internal project, estimate, proposal, or customer reference number. The project number may be used to coordinate Job Walk Pro records with estimating systems, accounting systems, proposal documents, customer purchase orders, internal job numbers, and facility asset records.
7.4 Enter the Building and Site Information
Enter the available site information, including building name, street address, city, state or province, postal code, country, customer name, site contact, contact information, building type, and survey date.
Review spelling carefully because this information may appear in the generated report.
7.5 Enter the Survey Purpose or Scope
Where the application provides a project description or scope field, briefly explain why the survey is being performed — for example: "Document existing rooftop HVAC equipment, nameplate information, visible condition, and access requirements for preparation of a replacement estimate." A clear scope helps anyone reviewing the project understand why the information was collected.
7.6 Save and Confirm the Project
- Select Save.
- Confirm that the project appears in the Project List.
- Open the project.
- Verify that the project details are correct.
- Allow the project to synchronize before beginning fieldwork.
Do not begin entering equipment under a project until you have confirmed that the correct project is open.
8. Managing the Project Overview
Once a project has been created, the next step is to complete the Project Overview. The Project Overview contains the general information that applies to the entire survey before individual equipment records are added. Completing the Project Overview first helps ensure that every report generated from the project contains accurate and consistent information.
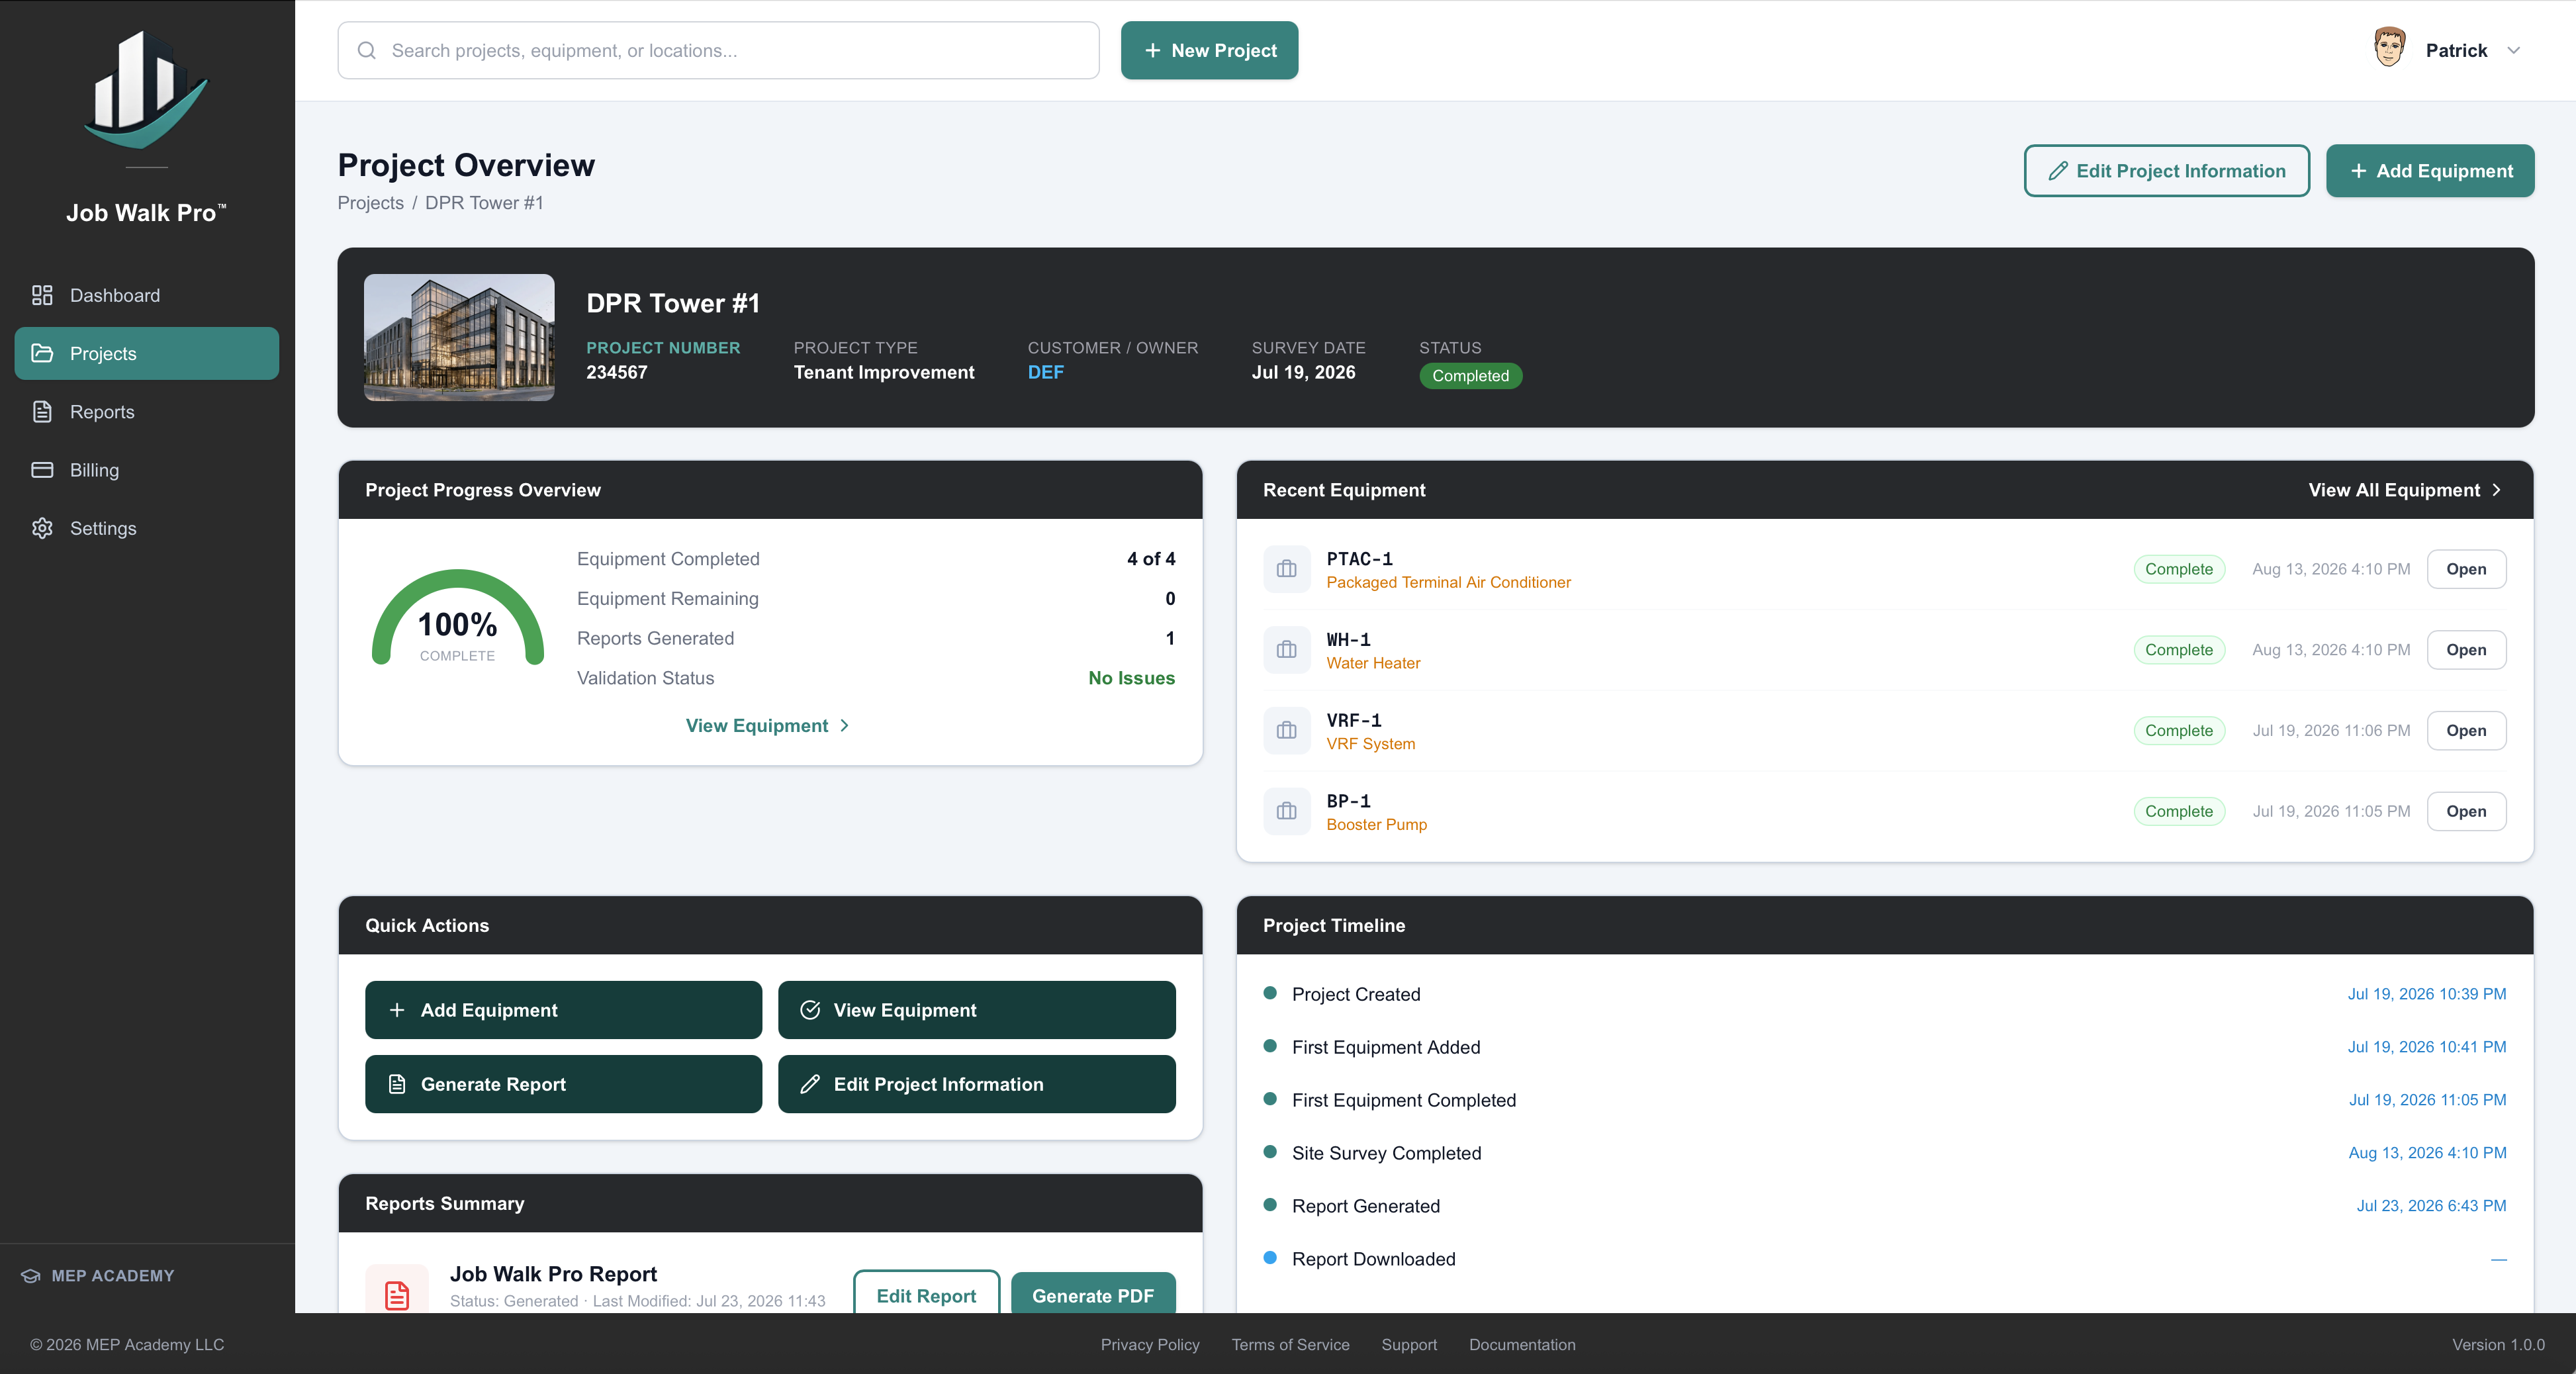
8.1 Open an Existing Project
- Sign in to Job Walk Pro.
- Open the Dashboard or Project List.
- Locate the desired project.
- Select the project name.
- The Project Overview will open.
Before making changes, confirm that the correct project is open by verifying the project name, building name, and address.
8.2 Review Project Information
Before beginning the equipment survey, review the information entered during project creation. Verify items such as project name, project number, building name, building address, customer name, site contact, survey date, and scope of work.
Correct any errors before adding equipment records. This information appears throughout the application and may be included in the final report.
8.3 Edit Project Information
Project information can be updated at any time: open the project, navigate to the Project Overview, select the field you wish to change, enter the revised information, and save your changes. Any updates will be reflected throughout the project and in future reports.
8.4 Understanding Project Status
As equipment records, photographs, and checklists are completed, the project becomes progressively more complete. A typical workflow follows this progression:
- Project created
- General project information entered
- Equipment records added
- Photographs captured
- Checklists completed
- Equipment information reviewed
- Reports generated
- Final review completed
Before generating the final report, verify that all required information has been entered.
8.5 Planning the Survey
Before entering the building, take a few minutes to plan the order in which equipment will be surveyed. Whenever practical: start on the roof and work downward, complete one mechanical room before moving to another, record equipment in the same order it is encountered, avoid skipping between unrelated areas, and photograph each piece of equipment before leaving its location.
A consistent workflow reduces the chance of missed equipment and misplaced photographs.
8.6 Organizing Equipment Records
Each physical piece of equipment should have its own equipment record. Typical equipment includes:
- Rooftop units
- Air handling units
- Boilers
- Chillers
- Cooling towers
- Pumps
- Exhaust fans
- Supply fans
- Unit heaters
- Fan coil units
- VAV boxes
- Heat exchangers
- Compressors
- Air compressors
- Water heaters
- Split systems
- Condensing units
- Package units
- Other mechanical or building equipment
Avoid combining multiple pieces of equipment into a single record. Each equipment record should describe one physical asset.
8.7 Equipment Naming Best Practices
Choose equipment names that are already used by the building whenever possible. Examples include RTU-1, AHU-2, EF-4, P-3, CH-1, and B-2. If no equipment designation exists, create a logical naming convention and use it consistently throughout the project.
Consistent naming makes reports easier to understand and simplifies future maintenance.
8.8 Recording Equipment Locations
Accurate equipment locations help others quickly locate equipment after the survey has been completed. Examples include Roof, Mechanical Room 101, Penthouse, Basement, North Wing, East Corridor, Loading Dock, Boiler Room, Electrical Room, Parking Garage, and Above Ceiling – Corridor B.
Use location names that match existing building terminology whenever possible.
8.9 Avoid Duplicate Equipment Records
Before adding new equipment: check whether the equipment already exists within the project, verify the equipment name, verify the equipment location, and confirm the equipment identifier.
Duplicate records create confusion and may result in duplicate photographs and duplicate report entries. If duplicate records are created accidentally, remove or archive the incorrect record before completing the survey.
8.10 Saving Your Work
Job Walk Pro may automatically save information as it is entered; however, users should confirm that important changes have been saved before moving to another screen or closing the application. Whenever possible: allow synchronization to complete before leaving the job site, verify that new equipment appears in the equipment list, and refresh the project if necessary.
9. Adding Equipment
The equipment record is the foundation of every Job Walk Pro project. Each equipment record stores all information related to one piece of equipment, including equipment identification, nameplate information, photographs, inspection notes, checklist responses, equipment condition, and additional observations.
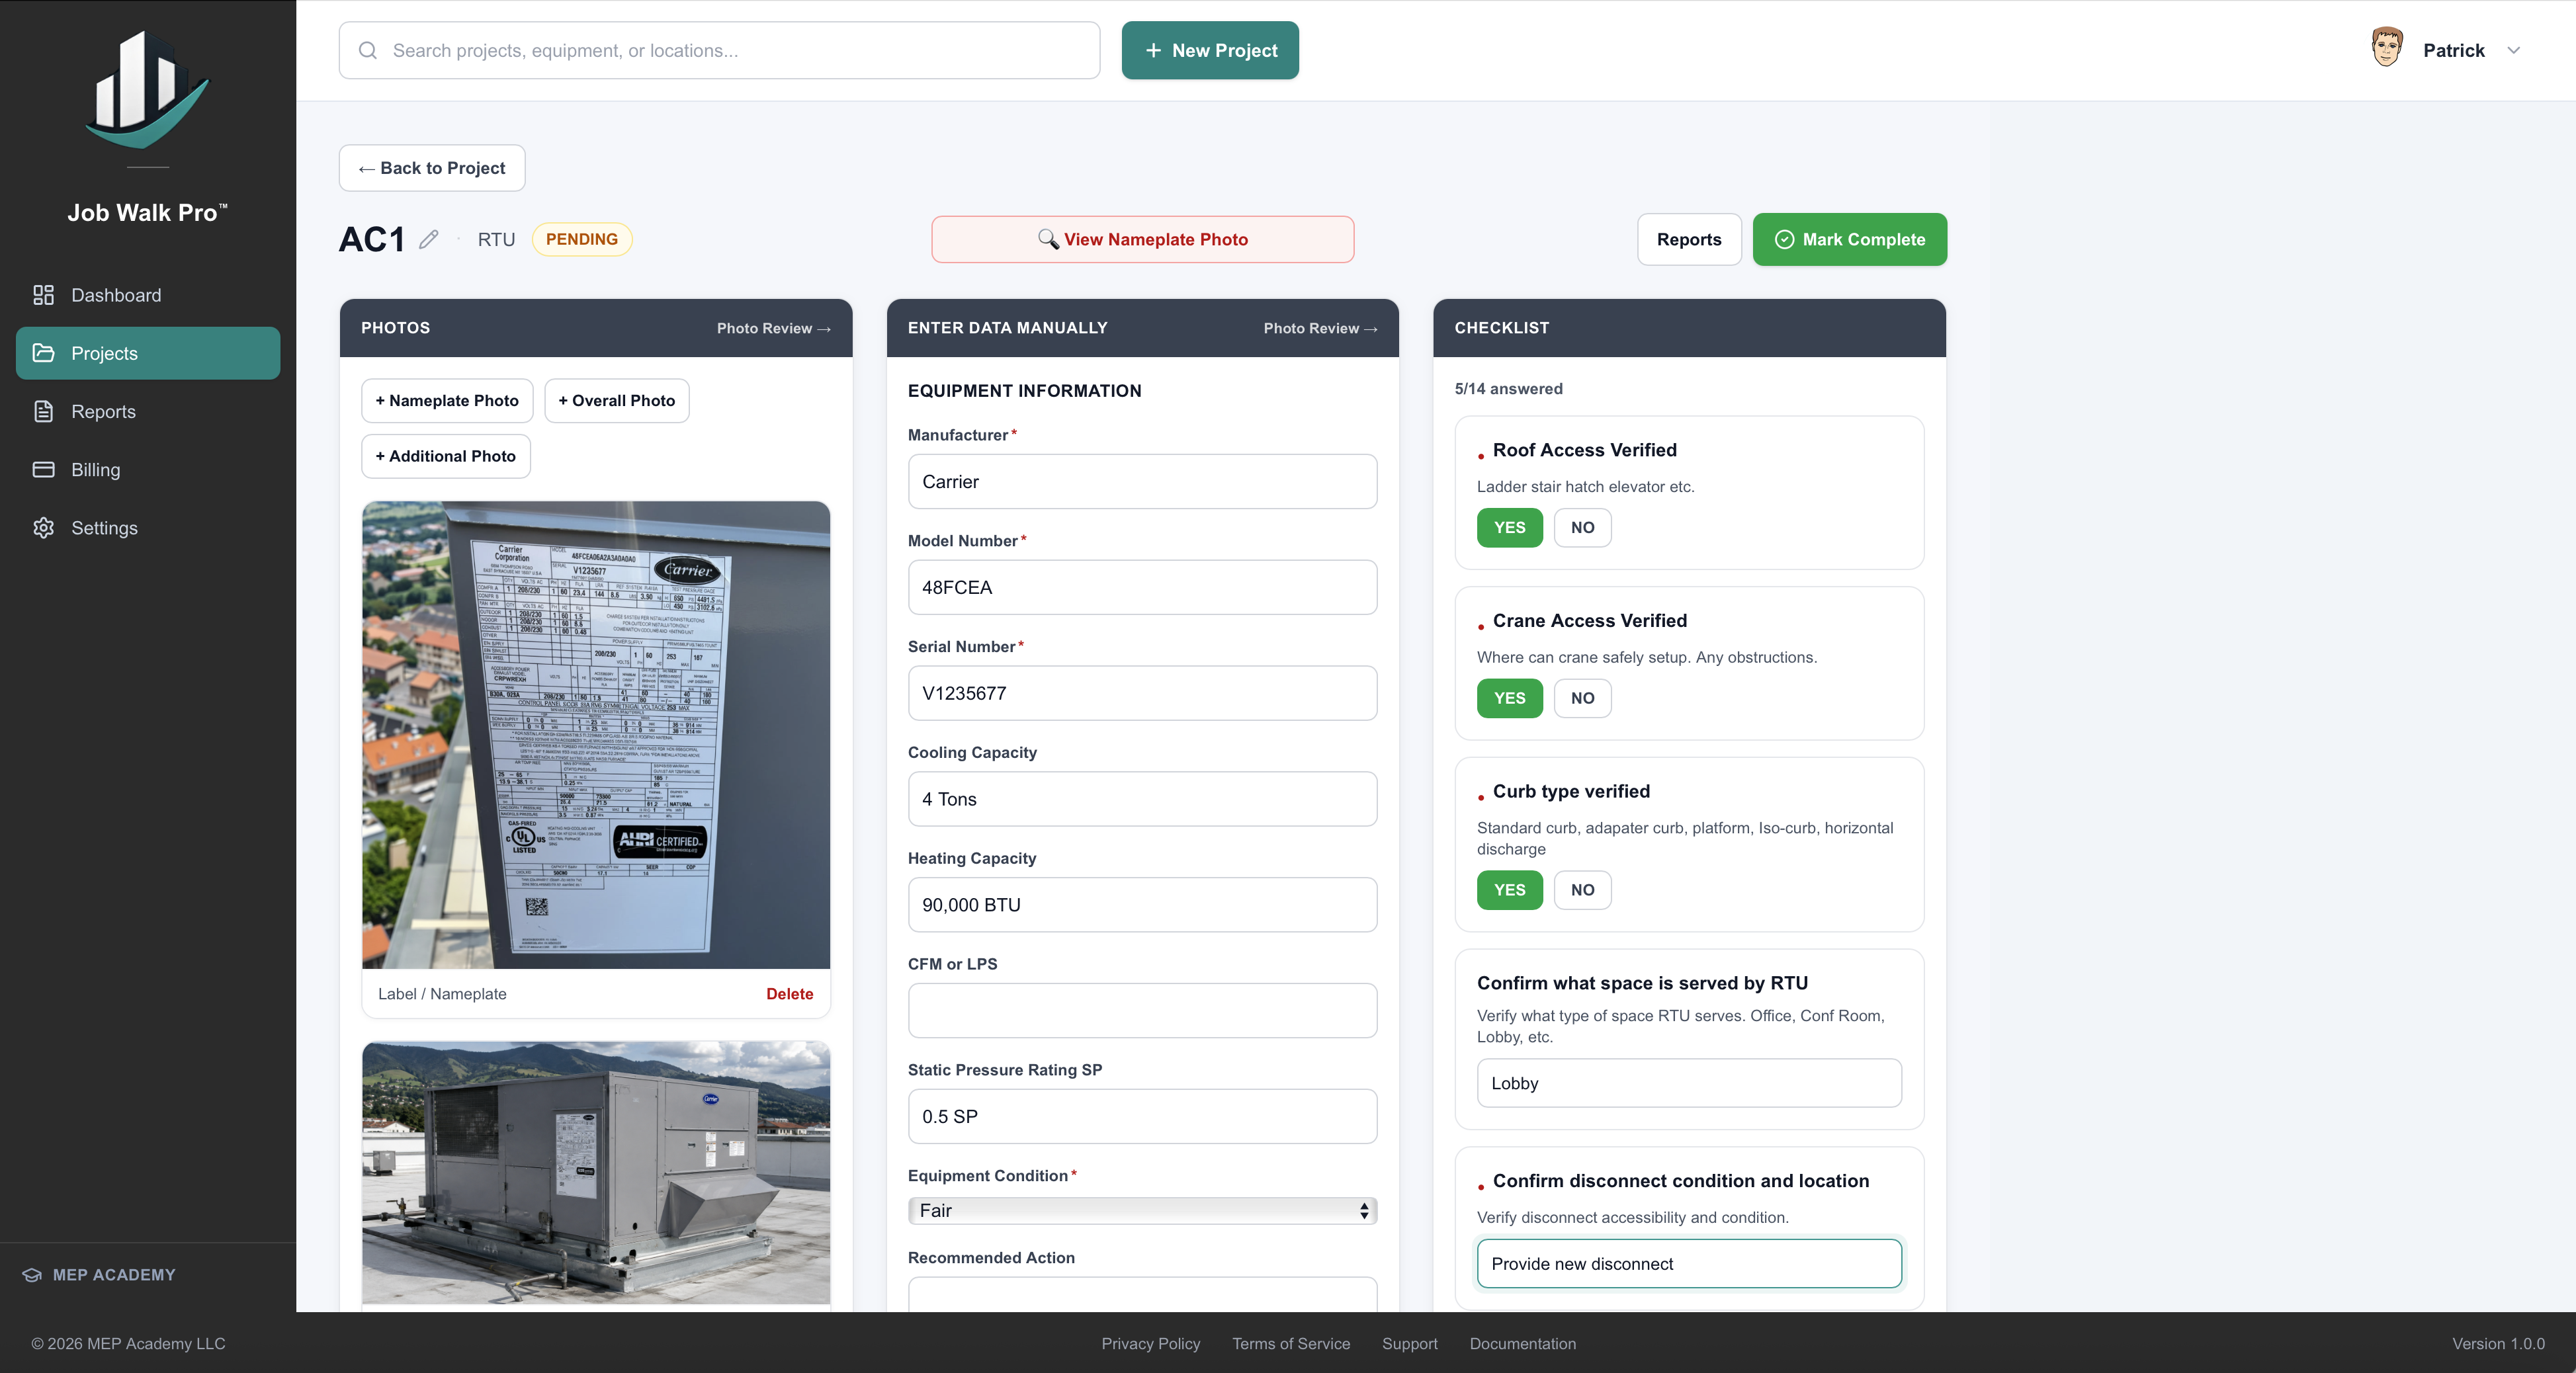
9.1 Create an Equipment Record
- Open the project.
- Navigate to the Equipment section.
- Select Add Equipment.
- Choose the equipment type if prompted.
- Enter the equipment name.
- Enter the equipment location.
- Save the equipment record.
The new equipment record will appear in the equipment list.
9.2 Select the Equipment Type
Choose the equipment category that most closely matches the equipment being surveyed. Examples include Air Handling Unit, Rooftop Unit, Boiler, Chiller, Pump, Exhaust Fan, Unit Heater, Fan Coil Unit, and Condensing Unit.
Selecting the correct equipment type helps organize the project and supports future reporting enhancements.
9.3 Enter the Equipment Name
Use the equipment designation displayed on the plans, building labels, or existing equipment tags whenever available. Examples: RTU-5, AHU-1, EF-2, B-1, CH-3. Avoid generic names such as Roof Unit, Boiler, or Pump.
Specific names improve report quality and simplify future maintenance.
9.4 Enter the Equipment Location
Record the equipment location using clear, recognizable descriptions. Examples include Roof, Roof – South, Mechanical Room 2, Penthouse, Basement Mechanical Room, and Parking Garage Level 1.
Location information allows maintenance personnel and future survey teams to locate the equipment efficiently.
9.5 Review Before Continuing
Before moving to the Equipment Details screen, verify that the equipment type is correct, the equipment name is correct, the equipment location is correct, and no duplicate record exists.
Taking a few seconds to verify this information now helps prevent errors later in the survey.
10. Completing Equipment Details
Once an equipment record has been created, the next step is to complete the equipment information. Each equipment record represents a single physical asset and should contain all information necessary to identify, evaluate, and document that equipment.
A complete equipment record generally includes equipment identification, equipment location, manufacturer, model number, serial number, equipment characteristics, electrical information, mechanical information, photographs, inspection checklist, and additional observations. The more complete the equipment record, the more useful the final report will be.
10.1 Open an Equipment Record
- Open the desired project.
- Navigate to the Equipment List.
- Select the equipment you wish to edit.
- The Equipment Details screen will open.
Verify that the equipment name displayed at the top of the screen matches the equipment you are standing in front of before entering information.
10.2 Recommended Workflow
To improve efficiency and reduce missed information, complete equipment records in the same order for every piece of equipment. We recommend the following sequence:
- Verify the equipment name and location.
- Capture overview photographs.
- Capture the equipment nameplate.
- Enter or verify equipment information.
- Complete the inspection checklist.
- Add observations or notes.
- Review the record before moving to the next piece of equipment.
Using the same workflow for every asset produces more consistent documentation and reduces the chance of overlooking important information.
10.3 Enter Manufacturer Information
Locate the manufacturer’s identification on the equipment or nameplate. Enter the manufacturer’s name exactly as shown whenever practical. Examples include Carrier, Trane, Daikin, Lennox, York, AAON, Greenheck, Bell & Gossett, Armstrong, and Taco.
Avoid abbreviations unless they appear on the equipment.
10.4 Enter the Model Number
The model number identifies the configuration of the equipment. Enter the complete model number exactly as shown on the manufacturer’s nameplate, taking care to include letters, numbers, hyphens, prefixes, and suffixes.
A single incorrect character may identify a different piece of equipment. If uncertain, verify the information using the equipment nameplate photograph before leaving the equipment.
10.5 Enter the Serial Number
The serial number uniquely identifies the equipment. Enter the serial number exactly as shown on the nameplate. Avoid confusing O and 0, I and 1, S and 5, and B and 8.
When practical, compare the entered value with the nameplate photograph before continuing.
10.6 Enter Equipment Characteristics
Depending on the equipment type, additional information may be requested, such as capacity, airflow, cooling capacity, heating capacity, fuel type, refrigerant, filter size, motor horsepower, number of compressors, number of fans, and number of stages.
Enter only information that can be verified through observation or available documentation. If a field cannot be confirmed, it is generally preferable to leave it blank rather than enter uncertain information.
10.7 Enter Electrical Information
Where available, record the electrical characteristics from the equipment nameplate. Typical fields include voltage, phase, frequency, Full Load Amps (FLA), Minimum Circuit Ampacity (MCA), Maximum Overcurrent Protection (MOCP), breaker size, and fuse size.
These values are commonly used during estimating, replacement planning, and equipment verification. Enter values exactly as shown on the manufacturer’s nameplate.
10.8 Enter Mechanical Information
Mechanical information varies by equipment type. Examples may include cooling capacity, heating capacity, airflow (CFM), external static pressure, refrigerant type, refrigerant charge, water flow, pump head, boiler input, boiler output, and efficiency rating.
Only record values that can be verified from the equipment or available documentation.
10.9 Custom Fields
Some organizations may configure additional project-specific fields, such as asset number, facility identifier, maintenance district, replacement priority, equipment condition, department, cost center, and customer asset ID.
Complete these fields according to your organization’s standards.
10.10 Review Before Leaving the Equipment
Before moving to the next piece of equipment, verify that the equipment name is correct, the manufacturer is correct, the model number is complete, the serial number is complete, the equipment location is correct, required photographs have been captured, the checklist has been completed, and notes have been entered where appropriate.
Taking thirty seconds to review the record while standing at the equipment is much easier than returning later because information was missed.
11. Capturing Equipment Photographs
High-quality photographs are one of the most valuable parts of a Job Walk Pro report. Photographs provide permanent visual documentation of equipment condition at the time of the survey.
11.1 Photograph Sequence
For consistency, photograph equipment in the following order:
- Overall equipment view.
- Equipment from a second angle.
- Manufacturer’s nameplate.
- Controls or electrical section (when appropriate).
- Any deficiencies or damaged components.
- Additional supporting photographs as needed.
Following the same sequence for every piece of equipment makes reports easier to review.
11.2 Equipment Overview Photo
The first photograph should clearly identify the equipment. Whenever possible: capture the entire piece of equipment, include surrounding reference points, keep the equipment centered, avoid unnecessary background clutter, and ensure adequate lighting.
The overview photograph should allow someone unfamiliar with the site to recognize the equipment.
11.3 Nameplate Photograph
The nameplate photograph is often the most important image in the equipment record. When capturing the nameplate: fill as much of the image as practical with the nameplate, hold the camera steady, avoid glare from sunlight or flash, ensure all text is sharp and readable, and capture the entire nameplate, including edges.
If the text cannot be read without zooming excessively, retake the photograph before leaving the equipment. A high-quality nameplate photograph greatly improves manual data entry and supports optional AI-assisted extraction when available.
11.4 Photographing Deficiencies
If deficiencies are observed: photograph the overall condition first, then capture close-up views of the specific issue, include enough surrounding equipment to provide context, and, if necessary, capture multiple angles.
Examples include corrosion, oil leaks, damaged insulation, broken access panels, missing fasteners, rust, water damage, damaged supports, and unsafe conditions.
Photographs should document conditions objectively without speculation.
11.5 Photograph Quality Tips
Good photographs are sharp, well lit, properly exposed, in focus, properly oriented, free of excessive glare, and properly framed. Avoid blurry photographs, extremely dark images, overexposed images, fingerprints on the camera lens, obstructed views, and cropped nameplates.
High-quality photographs improve both the usefulness of the report and future reference value.
12. Completing Inspection Checklists and Field Notes
Inspection checklists provide a structured method for evaluating equipment and documenting field observations consistently. Rather than relying solely on memory, checklists help ensure that each piece of equipment is evaluated using the same process, resulting in more complete and professional reports.
Job Walk Pro checklists are intended to assist documentation. They do not replace engineering evaluations, code inspections, commissioning, or safety assessments.
12.1 Open the Equipment Checklist
- Open the project.
- Select the desired equipment record.
- Navigate to the Checklist tab.
- Review each checklist item individually.
Complete the checklist while standing at the equipment whenever practical.
12.2 Complete Each Inspection Item
Review every checklist item carefully before selecting a response. Typical inspection items may include:
- Equipment accessible
- Equipment operating
- Nameplate legible
- Visible corrosion
- Cabinet condition
- Coil condition
- Belt condition
- Filter condition
- Insulation condition
- Electrical disconnect present
- Equipment labeling
- General housekeeping
- Visible leaks
- Evidence of previous repairs
Answer each question based on your direct observations at the time of the survey. If a checklist item cannot be verified safely, do not guess. Record an appropriate note explaining why the item could not be confirmed.
12.3 Record Objective Observations
Field observations should describe what you observed rather than what you believe caused the condition. Good examples include:
- Surface corrosion visible on access panel.
- Condensate staining beneath cooling coil.
- Belt appears worn and cracked.
- Filter heavily loaded with dust.
- Equipment identification label missing.
- Exterior insulation damaged.
- Access to equipment partially obstructed.
Avoid conclusions that cannot be confirmed through visual observation. For example, instead of writing "Compressor is failing," write "Compressor produced unusual mechanical noise during operation." The report should document observable conditions, allowing qualified personnel to determine the appropriate corrective action.
12.4 Use Notes Effectively
The Notes field is intended to capture information that is not already covered elsewhere in the equipment record. Examples include equipment difficult to access, equipment operating during occupied hours, temporary construction affecting access, equipment surrounded by stored materials, additional observations requested by the customer, and items requiring follow-up.
Keep notes concise, professional, and factual. Avoid informal language, speculation, or opinions unrelated to the survey.
12.5 Document Deficiencies Clearly
If deficiencies are observed: describe the condition, capture supporting photographs, identify the location of the deficiency, and avoid recommending repairs unless that is part of the project scope.
Examples: Access panel missing retaining screws. Cabinet corrosion observed along lower section. Flexible connection torn. Insulation damaged near discharge opening. Oil residue observed beneath compressor compartment.
Objective documentation is generally more valuable than subjective conclusions.
12.6 Safety Considerations
Job Walk Pro is not a safety management system. Users should never place themselves at risk to collect additional information or photographs. Do not open energized electrical equipment unless authorized and qualified, remove equipment guards, enter confined spaces without proper authorization, climb onto equipment not designed for access, ignore site safety rules, or operate equipment solely to complete documentation.
If information cannot be obtained safely, record the limitation in the Notes section.
13. Reviewing Equipment Records
Before leaving the project site, review each equipment record to confirm that the information collected is complete and accurate. A thorough review while still on-site reduces the likelihood of return visits.
13.1 Equipment Record Review Checklist
For each piece of equipment, verify that:
- Equipment name is correct.
- Equipment type is correct.
- Equipment location has been entered.
- Manufacturer has been recorded.
- Model number is complete.
- Serial number is complete.
- Required equipment characteristics have been entered.
- Electrical information has been entered where applicable.
- Mechanical information has been entered where applicable.
- Required photographs have been captured.
- Checklist items have been completed.
- Notes have been entered when appropriate.
13.2 Review Photographs
Open each photograph before leaving the equipment. Verify that the photograph is sharp, the image is properly exposed, the correct equipment was photographed, the nameplate is readable, required deficiency photographs are present, and no important portions of the equipment have been cropped.
Retake photographs immediately if they do not meet these standards.
13.3 Review Project Completeness
Before leaving the site, review the Equipment List. Confirm that every piece of equipment intended for the survey has been documented, no duplicate equipment records exist, equipment names are consistent, equipment locations are complete, and no records appear incomplete.
A complete review at the project site is considerably more efficient than attempting to reconstruct missing information later.
14. Synchronizing Projects
Job Walk Pro synchronizes project information between the mobile application and the web application using secure cloud services. Synchronization ensures that project information entered in the field is available for review and report generation.
14.1 Allow Synchronization to Complete
After completing field work: confirm that an Internet connection is available, leave the application open briefly to allow synchronization to finish, verify that synchronization indicators show completion, and open the web application later to confirm that all project information has been received.
Do not uninstall the application or sign out while synchronization is still in progress.
14.2 Confirm Synchronization
When returning to the office: sign in to the Job Walk Pro web application, open the project, review several equipment records, and confirm that photographs, notes, and checklist responses appear correctly.
If information appears to be missing, allow additional time for synchronization or contact Support before making duplicate entries.
15. Generating Professional Reports
Once all project information has been reviewed, the project is ready for report generation. Reports summarize the information collected during the site survey and provide a professional record for customers, project teams, and future reference.
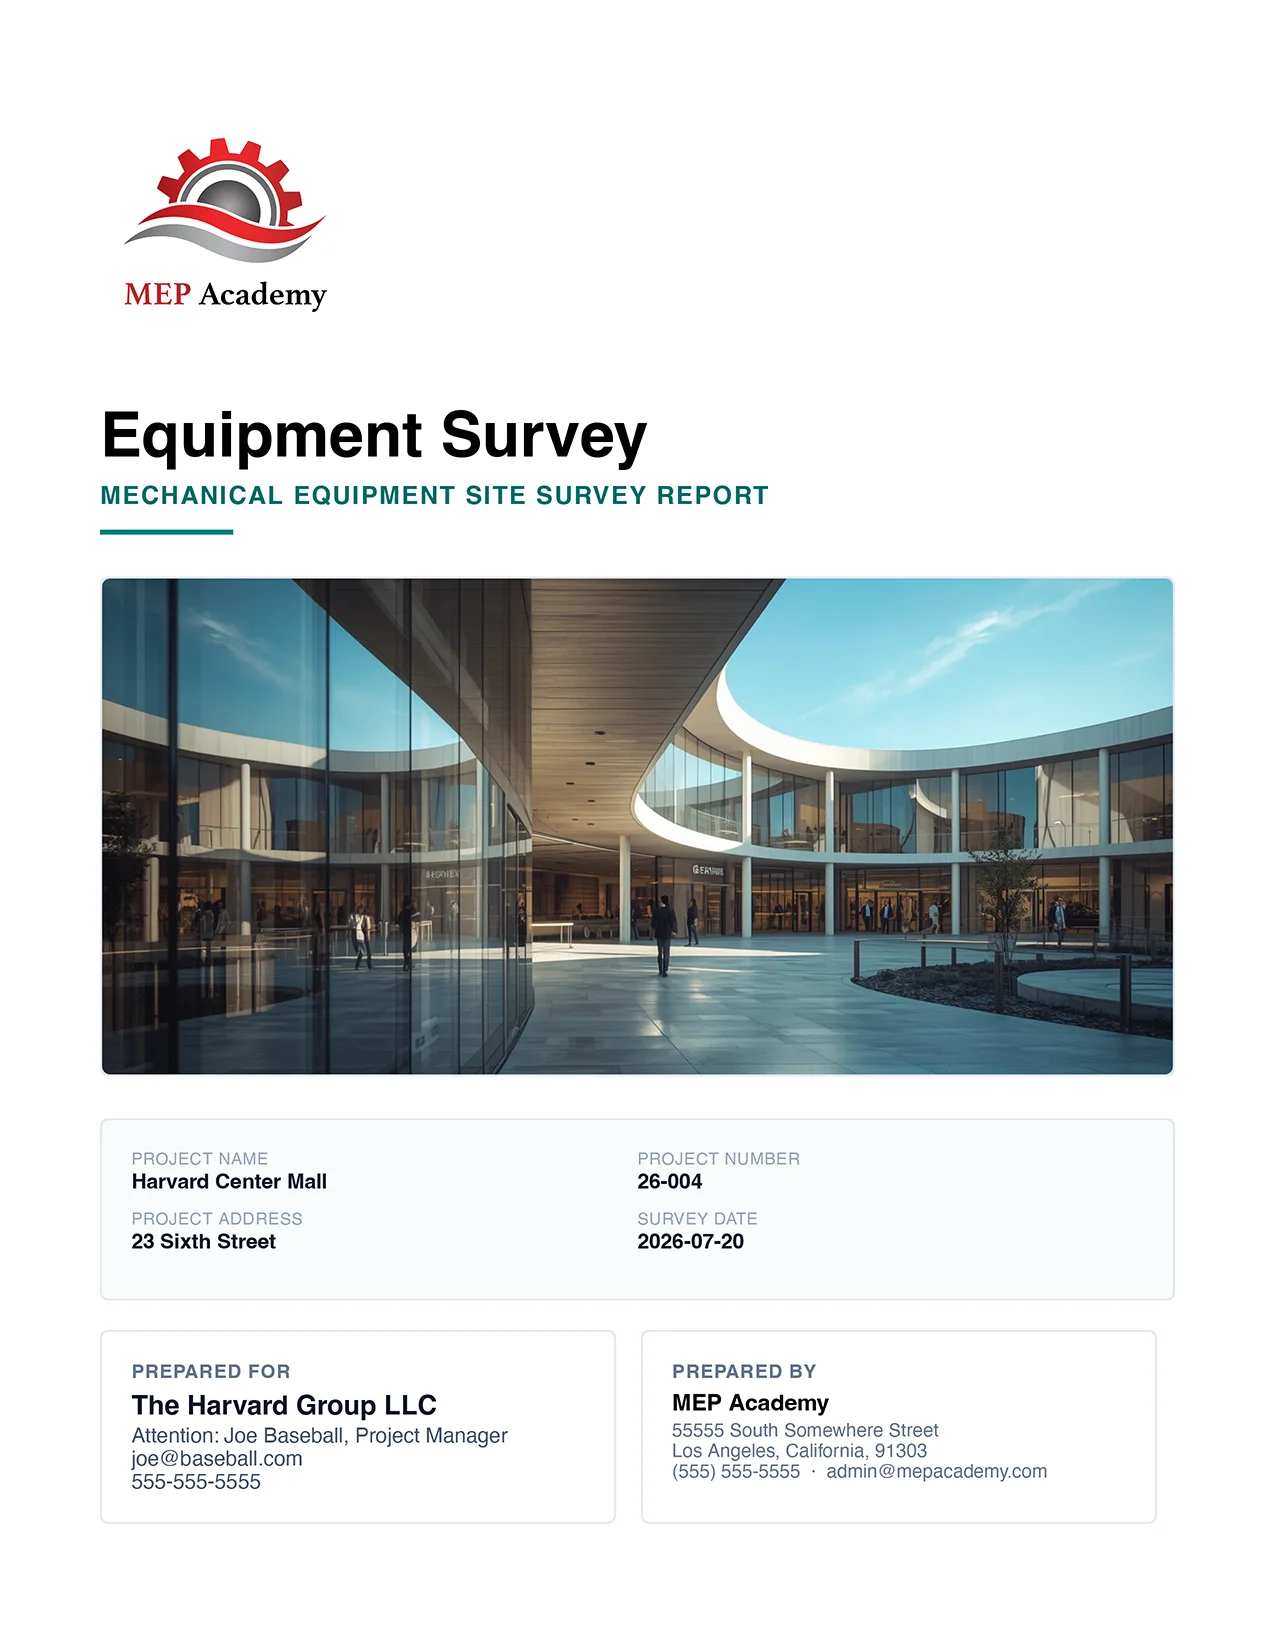
Sample Equipment Survey Report
See an example of a completed Job Walk Pro mechanical equipment survey report, including project information, equipment summaries, condition assessments, photographs, recommendations, and next steps.
View Sample Report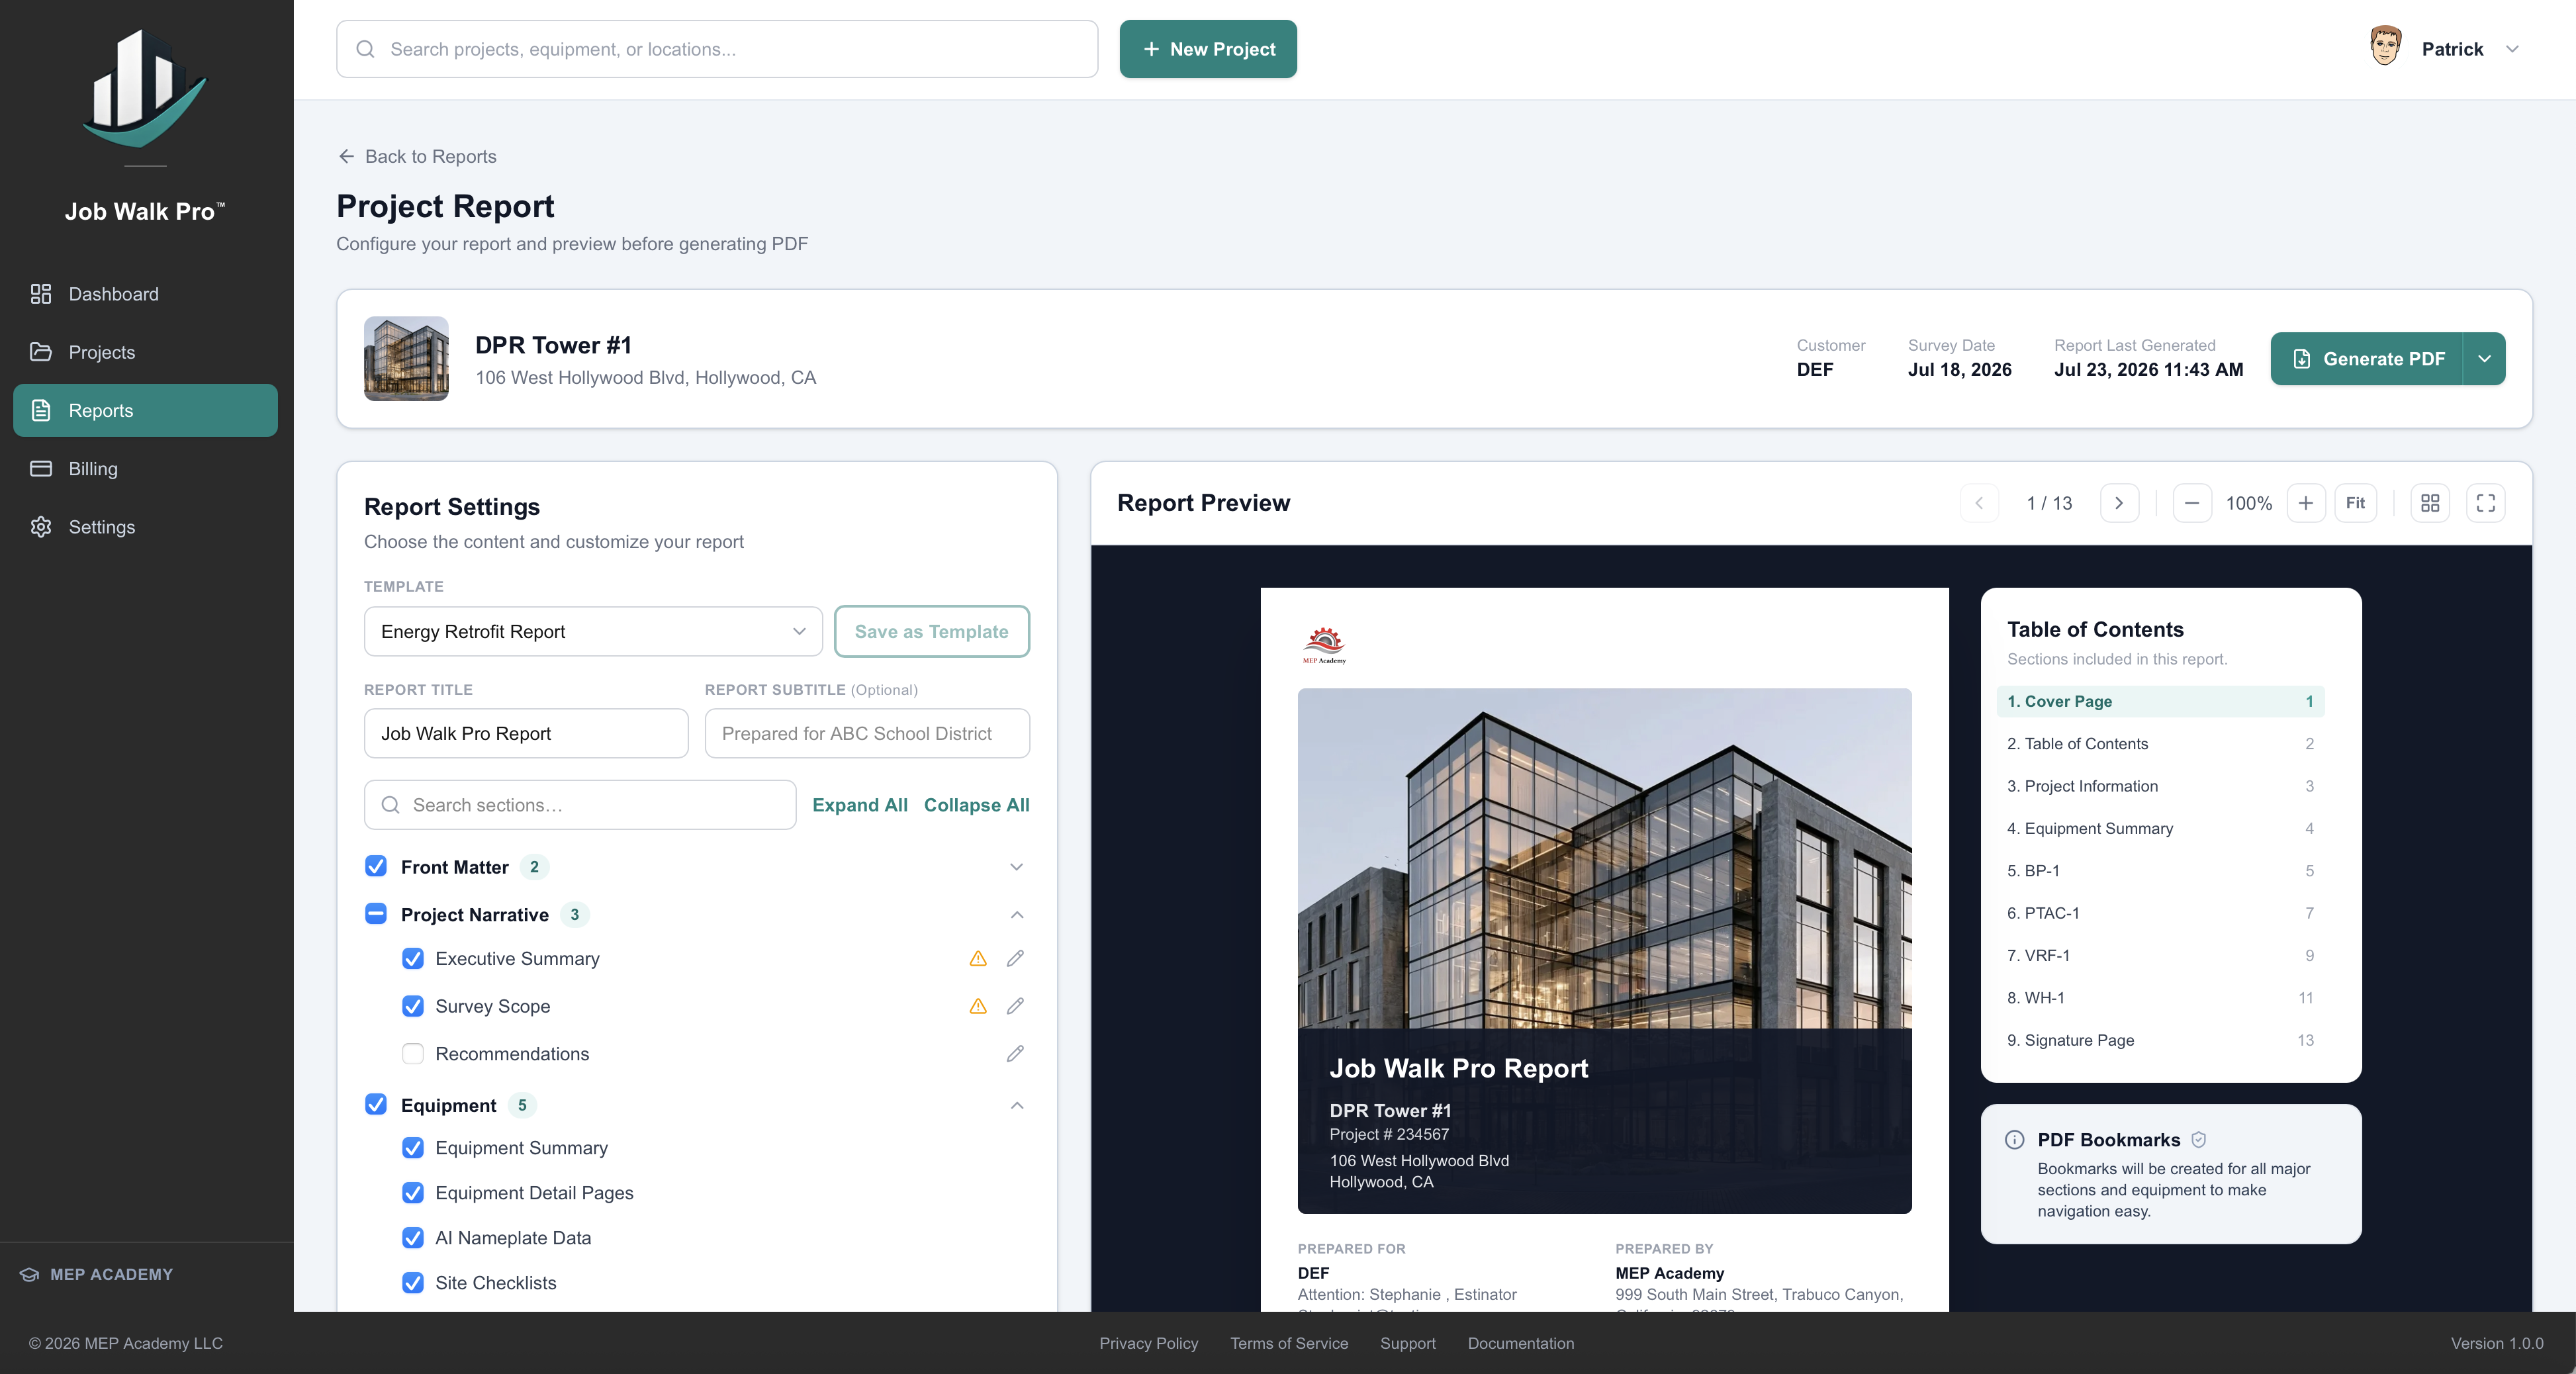
15.1 Open the Reports Section
- Open the completed project.
- Navigate to the Reports section.
- Review the available report options.
- Select the desired report format.
15.2 Review Report Content
Before generating the report, confirm that the desired sections are included. Depending on the application version, available sections may include Cover Page, Executive Summary, Project Information, Equipment Summary, Equipment Details, Equipment Photographs, Inspection Checklists, and Photo Appendix.
Select only the sections appropriate for the intended audience.
15.3 Generate the Report
- Select Generate Report.
- Wait for the report to finish processing.
- Review the completed report for accuracy.
- Download or save the report as needed.
Large projects containing many photographs may require additional processing time.
15.4 Final Quality Review
Before distributing the report: review the cover page, confirm project information, verify equipment names, check photograph placement, confirm that photographs are readable, review notes for spelling and clarity, ensure that all intended equipment has been included, and confirm that no confidential information has been unintentionally included.
A careful final review reflects professionalism and reduces the need for revised reports.
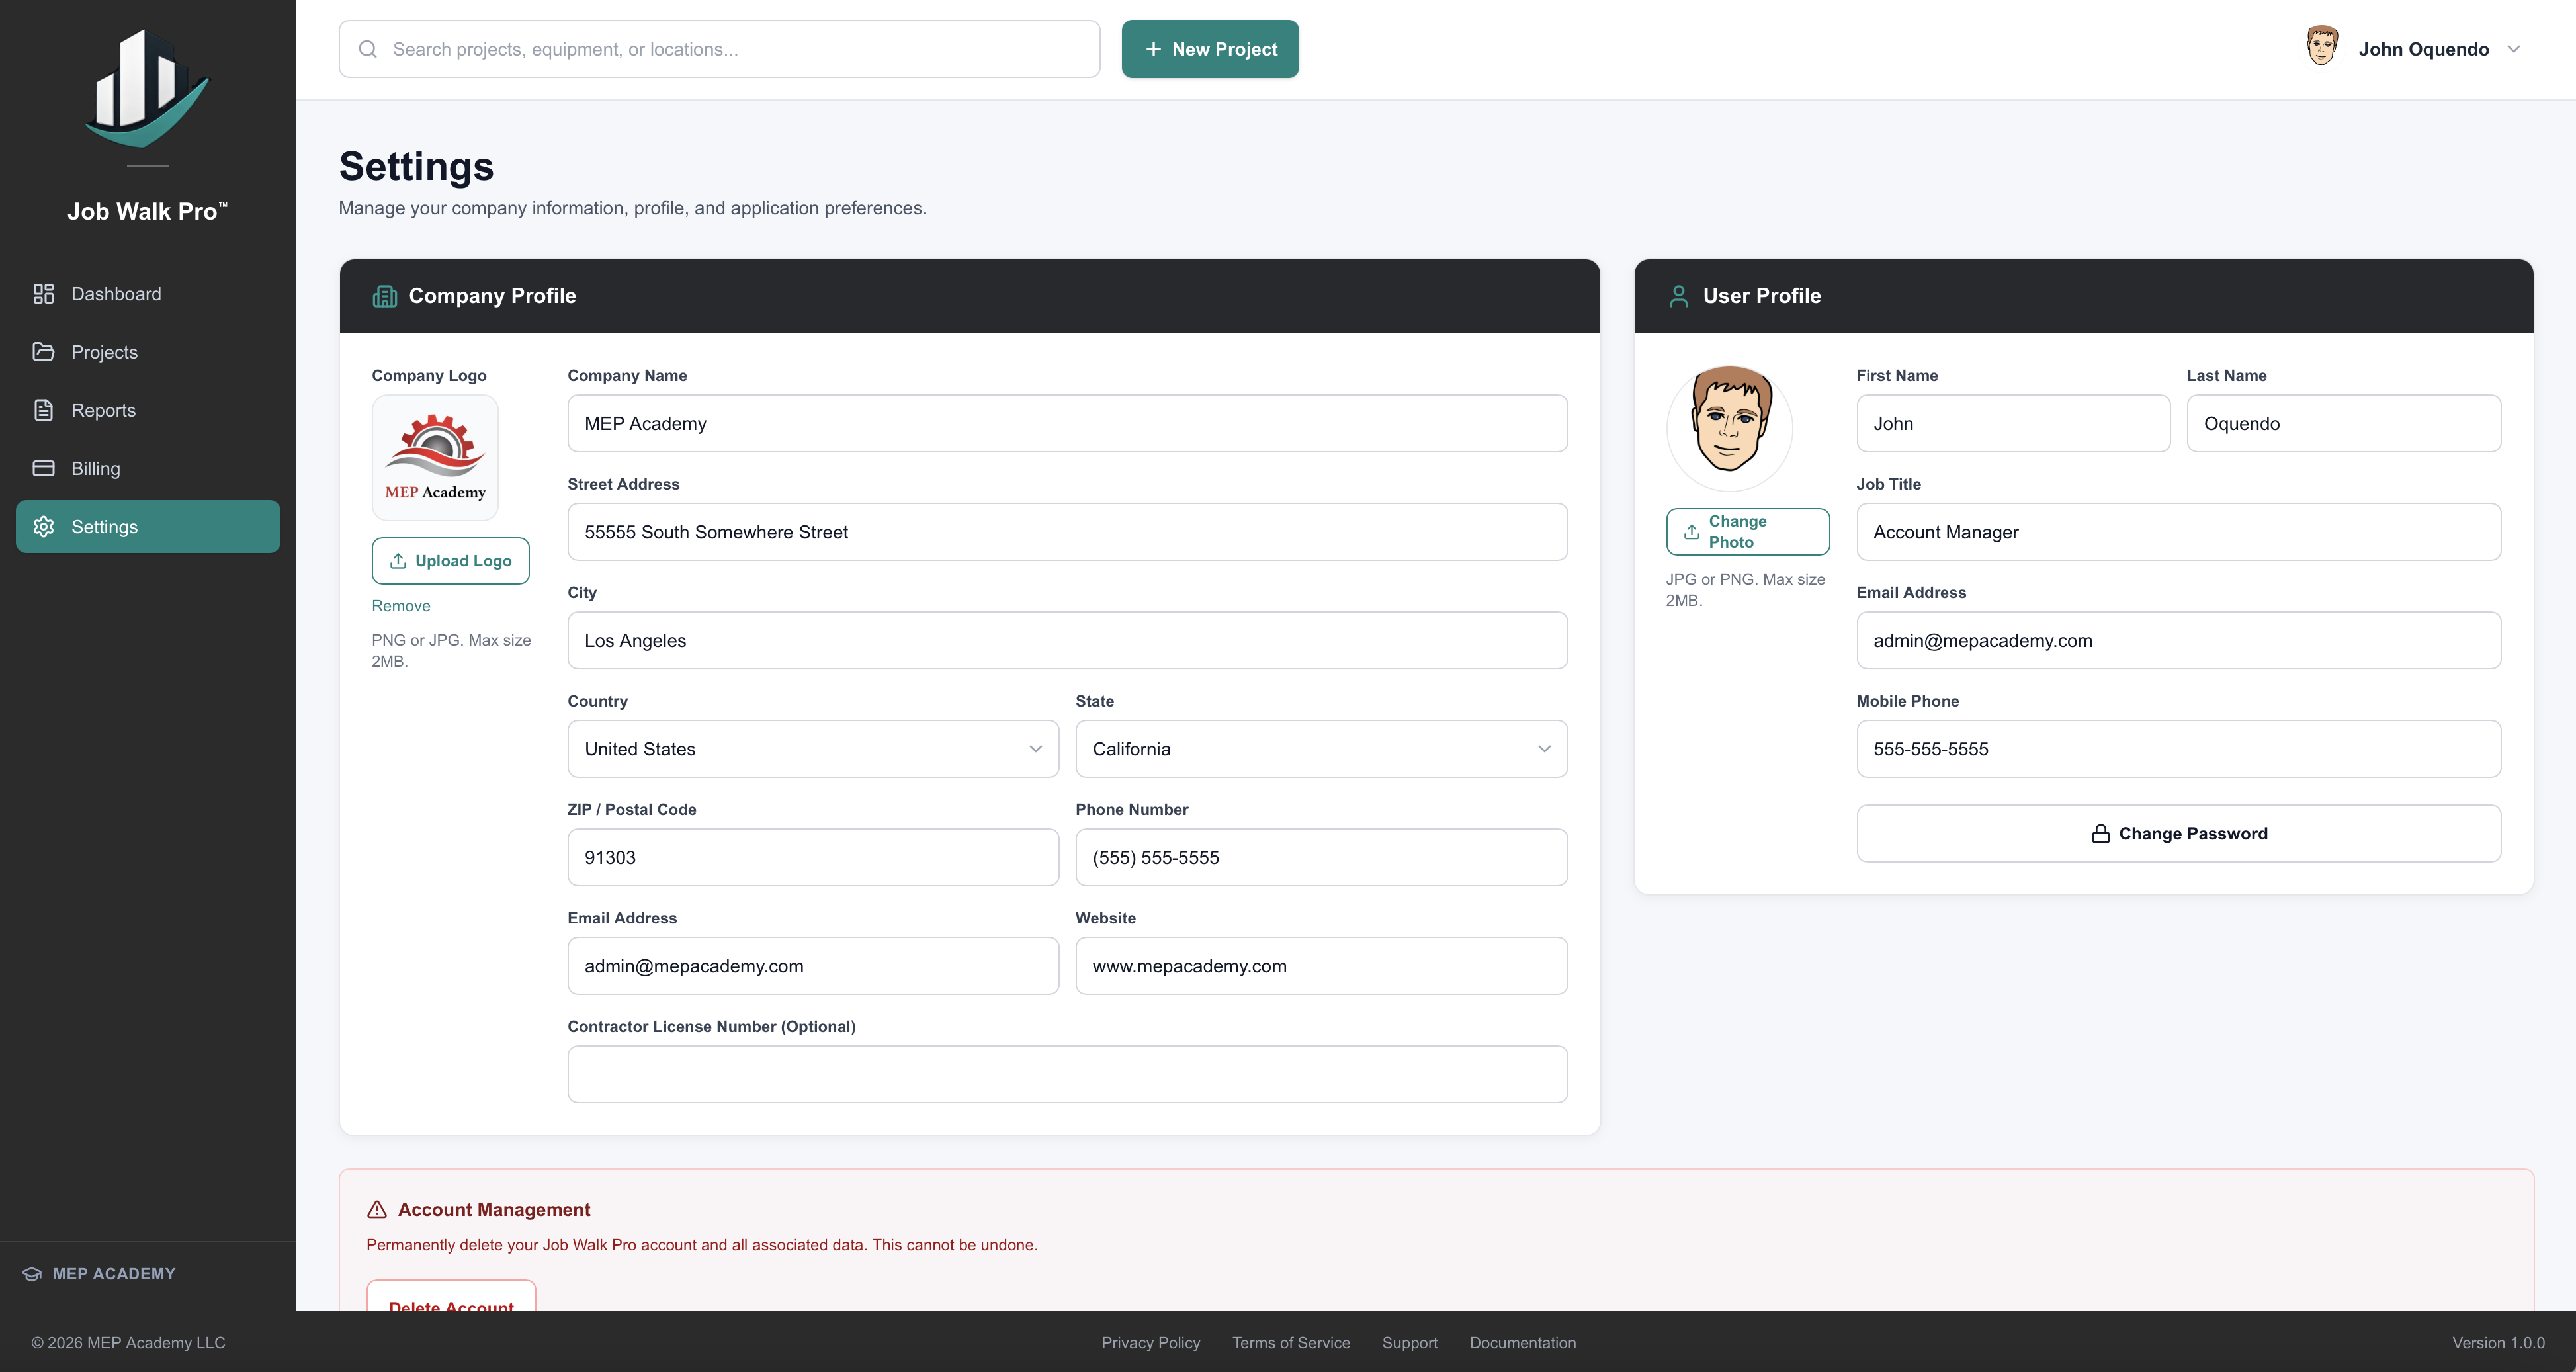
16. Account Settings
The Account Settings section allows you to manage your personal account, subscription, and application preferences.
16.1 Updating Your Account Information
- Sign in to Job Walk Pro.
- Open Account Settings.
- Select the information you wish to edit.
- Update the desired fields.
- Save your changes.
Depending on your account, you may be able to update your name, company name, email address, password, profile information, and notification preferences. Some changes may require email verification before taking effect.
16.2 Changing Your Password
- Open Account Settings.
- Select Change Password.
- Enter your current password.
- Enter your new password.
- Confirm the new password.
- Save your changes.
Choose a strong password that is unique to your Job Walk Pro account.
16.3 Subscription Management
The Subscription section displays information such as current subscription plan, renewal date, billing status, payment method (managed by the payment processor), and subscription history. From this page you may update payment information, change subscription plans (if available), cancel automatic renewal, and view billing history.
16.4 Signing Out
When using a shared computer or mobile device: save your work, allow synchronization to complete, and select Sign Out. Signing out helps protect your account from unauthorized access.
16.5 Delete Your Job Walk Pro Account
You can permanently delete your account and associated data at any time. In the mobile application: open Account, select Delete Account, and follow the confirmation steps. In the web application: open Settings, then Account, and select Delete Account.
If you are unable to sign in, submit a request from the public Delete Your Account page (jobwalk.pro/delete-account) using the email address associated with your account — no app installation is required.
Account deletion cancels any active subscription and permanently deletes your projects, equipment records, photographs, checklists, and reports, subject to the limited retention exceptions described in the Privacy Policy. This action cannot be undone.
17. Best Practices
The following recommendations will help produce consistent, professional project documentation.
17.1 Survey Equipment in a Consistent Order
Whenever practical: start in one area, complete every piece of equipment in that area, move systematically through the building, and avoid jumping between unrelated locations. This approach reduces missed equipment and duplicate records.
17.2 Complete One Equipment Record Before Moving On
For each piece of equipment: enter equipment information, capture photographs, complete the checklist, add notes, and review the record before proceeding to the next piece of equipment. Avoid leaving partially completed records whenever possible.
17.3 Verify Nameplate Information
Manufacturer, model number, and serial number are among the most important fields in the application. Always compare manually entered values with the nameplate photograph before leaving the equipment. Correcting errors on-site is much easier than returning later.
17.4 Capture More Photographs Than You Think You Need
Additional photographs often prove valuable during report preparation. When in doubt, capture another overview photograph, another angle, or another nameplate photograph. Storage is generally less expensive than a return trip to the job site.
17.5 Write Objective Notes
Record what you observed — not what you assume. Objective documentation is easier for customers, engineers, maintenance personnel, and future survey teams to understand.
17.6 Review Before Leaving the Site
Before leaving: review the Equipment List, review photographs, confirm synchronization, and verify project completeness. A final review often identifies missing information while it can still be collected.
18. Frequently Asked Questions
Can I edit a project after leaving the job site?
Yes. Project information may be updated through either the web application or mobile application, depending on the feature.
Can multiple people work on the same project?
Collaboration features may vary by subscription plan and application version. Refer to the current product documentation for supported capabilities.
Does Job Walk Pro work without an Internet connection?
Certain field activities may continue temporarily without connectivity, but synchronization, authentication, subscription management, and some features require an Internet connection.
Can I replace photographs later?
Yes. Photographs may generally be added, removed, or replaced before the final report is generated.
Is AI extraction guaranteed to be correct?
No. AI-assisted extraction is intended to reduce manual data entry. Users remain responsible for reviewing and verifying all extracted information.
How often should I synchronize my projects?
Whenever a reliable Internet connection is available, especially before leaving the project site and again before generating reports.
19. Release Notes
Job Walk Pro is continuously improved through regular updates. Updates may include new features, user interface improvements, performance enhancements, bug fixes, security improvements, additional report options, expanded equipment support, and documentation updates.
Customers are encouraged to keep both the web and mobile applications up to date. The full version history is published on the Release Notes page.
20. Glossary
Equipment Record
A complete collection of information for one physical piece of equipment.
Project
A collection of equipment records associated with one customer, building, or survey.
Synchronization
The secure transfer of project information between authorized devices through Job Walk Pro’s cloud services.
Checklist
A structured inspection form used to document equipment observations consistently.
Nameplate
The manufacturer’s identification label attached to equipment containing model, serial number, electrical, and mechanical information.
Report
A professionally formatted document generated from project information collected within Job Walk Pro.
AI Extraction
An optional feature that assists with reading and extracting information from equipment nameplates and photographs.
21. Additional Resources
Additional information is available through:
- Support Center
- Privacy Policy
- Terms of Service
- Product announcements
- Training videos
- Future knowledge base articles
As Job Walk Pro evolves, this documentation will be updated to reflect new features and recommended workflows.
22. Document Revisions
This User Guide is periodically reviewed and updated as new functionality is added to Job Walk Pro. The version number and "Last Updated" date at the beginning of this document identify the current published edition.
Users should refer to the latest version available on the Job Walk Pro website.
Need more help? Visit Support.